
- <iframe width=”560” height=”315” src=”https://www.youtube.com/embed/qtMtA_G6bG8” title=”YouTube video player” frameborder=”0” allow=”accelerometer; autoplay; clipboard-write; encrypted-media; gyroscope; picture-in-picture; web-share” allowfullscreen=”“></iframe>
- Determining your website requirements
- Preparing for Hosting
- How much does it cost to host a website?
- Finding low-cost hosting
- Register a domain name
- Find a hosting provider
- Select a hosting plan
- Set Up Your Website
- Uploading Website Files
- Domain Name Configuration
- Testing Your Website
- Launch Your Website
- Optimizing Your Website for Performance
- Next Steps
- How to host a website FAQs
More and more businesses and organizations—even individuals—are finding it necessary to have a web presence.
If you’re one of them, this article will show different ways to host a website, including one simple three-step process.
This article has a lot to digest, so let’s get going.
We can take it slow and easy.
<iframe width=”560” height=”315” src=”https://www.youtube.com/embed/qtMtA_G6bG8” title=”YouTube video player” frameborder=”0” allow=”accelerometer; autoplay; clipboard-write; encrypted-media; gyroscope; picture-in-picture; web-share” allowfullscreen=”“></iframe>
How to host a website in 3 simple steps
- To host a website, you must first purchase a domain name from services like GoDaddy, NameCheap, or Google Domains.
- Then, choose a hosting provider. For instance, Tiiny.host is recommended for its simplicity and ease of use.
- Once you have your domain name and hosting provider, upload your existing website to your host using the drag-and-drop feature.
If you don’t have a website, use an HTML website builder like Webflow or brizy.io to create one. These tools offer customizable templates and user-friendly interfaces for easy website creation.
Related article: Beginners Guide to Web Hosting
Determining your website requirements
The elements that dictate your website’s hosting requirements are clear.
- The number of pages on your website. This affects storage requirements.
- The amount of media (images, videos, audio, etc.) on your pages. Media loads slower than text and requires more storage space.
- The speed you want for delivering your pages to your visitors. Faster is better.
The type of website you have, either static or dynamic, is also a crucial determiner.
For instance, Tiiny.host serves static websites. These are fast-loading and very secure. Static hosting is also less expensive compared to dynamic hosting.
Dynamic websites offer more interaction with your visitors but must perform computer processing for each page served. This processing slows down your page delivery and opens the computer to hackers and malware.
Preparing for Hosting
Before hosting, the obvious first step is to create your website.
If you already have a website, you can skip to the next section.
If you haven’t built your website yet, here are some tools you can use.
- Webflow.com is a modern no-code website builder that lets you build your website for free. No code means you don’t have to write a single line of code or HTML to create your pages. You can then export the web files to host them anywhere you wish. Optionally, you can pay to have Webflow host your static site. Webflow’s prices are moderate to high.
- Brizy.io is another effective no-code web development service. Offering lower-priced tiers than Webflow, Brizy allows both static and dynamic websites. Dynamic sites are required for popular apps like WordPress. Build your website using their service, then either host with them or anywhere else you wish.
RECOMMENDED ARTICLE: How to build a static website
How much does it cost to host a website?
Depending on your website’s requirements, hosting fees range from free to extremely expensive. Although that’s not very helpful, it does help to know that high-quality web hosting isn’t necessarily cheap. But you can find true bargains. It would be best if you shop wisely.
As a rule of thumb, the hosting price goes up with the size and complexity of your site. Also, cheaper usually means slower speeds, which is a concern even for people on a budget with small websites.
Many cheap hosting services offer plans for a couple of bucks a month. These are generally on shared servers. Shared servers have many websites on them and slow down under traffic load. This can lead to undesirable delays in loading your web pages for your visitors.
Finding low-cost hosting
The trick is to find a service offering low-cost and secure, fast servers.
We’ll use our platform, Tiiny.host, as an example.
Tiiny.host offers a freemium service in which you can host your website without any cost. That’s the free part. Then you choose from a range of low-cost hosting options, paid monthly.
Tiiny.host servers use state-of-the-art Amazon hardware and software. No speed penalty there. And industrial-strength web security is guaranteed. This is a powerful combination, especially in an affordable hosting plan.
But you must choose your hosting service based on your website’s specific requirements.
Register a domain name
The first step in your hosting journey is to choose and buy a domain name. This will be the web address where users can find your website (e.g., www.yourwebsite.com).
Choosing a domain name is a crucial task. If you are building a professional or business website, your domain name should reflect your brand. Ideally, your domain name is your company name. Often, businesses choose their company name based on domain names available for purchase. If your business name isn’t available as a domain, you can get creative.
When you buy a domain name, the name is registered as a unique web address with ICANN, the Internet Corporation for Assigned Names and Numbers (ICANN). ICANN is a non-profit organization that oversees the assignment of both IP addresses and domain names.
You can only register a domain name through specific websites called domain registrars. These registrars sell you your domain name and. store your domain information so that ICANN can access it.
Domain registrars are numerous.
- GoDaddy is one of the largest domain registrars. They often have domain names available at reduced prices.
- NameCheap is known for low-cost domain sales. They’ve been around for a long time.
- Google Domains is a mid-priced domain registrar with many functions. Developers like Google domains.
CAUTION: Most low-cost domain prices are inexpensive for the first year only. After that first year, you will pay the standard price. This is important because buying a domain name is a long-term investment, and costs can add up over time.
So, make sure you know what the domain will cost you after the first year so there are no unfortunate surprises.
Find a hosting provider
Web hosting companies provide the servers where your website will live.
Choosing a hosting provider can get complicated if you’re not careful. As we explain in the next section, there are many different hosting types.
What you’re looking for is a company with a solid reputation that provides servers that meet your website’s requirements—having added features such as analytics, password protection, and ease-of-use (some hosts are notoriously difficult to use, I’m looking at you Amazon). But a good hosting company will provide a simple interface to the servers so that even beginners can use their hosting service without problems.
Again, we take Tiiny.host as an example.
Tiiny.host is the simplest way to host your static website.
Using their home page shown below, there are only three steps to having your website live online.
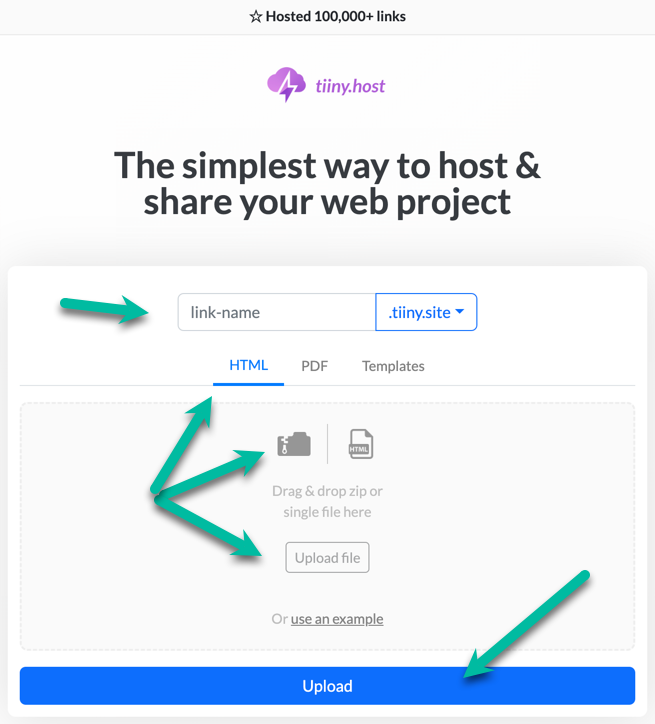
It doesn’t get any simpler than this.
- Provide a link-name as a temporary domain name.
- Drag & drop your zipped website into the center gray box.
- Click the big, blue Upload button.
Tiiny.host performs some magic, and in a few moments, your website is live. Anyone on the web can view it.
Select a hosting plan
Once you’ve chosen a hosting company, you’ll need to select a hosting plan. This plan will determine how much storage space you have, how much bandwidth you’re allowed, and what additional features are included. Make sure to choose a plan that fits your needs and budget.
Many different types of hosting are available, including shared hosting, VPS hosting, dedicated hosting, and cloud hosting.
Shared hosting
As mentioned above, shared hosting is the cheapest type of server. I say cheap because, although many take advantage of the rock-bottom pricing, the service can be slow. Shared hosting supports both static and dynamic hosting.
VPS hosting
VPS is business-class hosting. Virtual Private Server (VPS) is not shared hosting. It provides the power, storage, and bandwidth required for e-commerce sites and other large, interactive websites. It is also more expensive, in the medium-high range.
Dedicated hosting
Elite power users choose dedicated hosting. Dedicated means leasing a separate computer to serve a specific site. This is a premium (expensive) option for huge operations or sites requiring special security measures.
Google itself is built on networks of dedicated hosting. They own a lot of computers.
Cloud hosting
Unlike traditional hosting, which uses a single server, cloud hosting uses a network of servers to provide greater scalability and flexibility.
Cloud hosting combines the power and reliability of a virtual private server (VPS) with the simplicity of a shared hosting service. It can handle large amounts of traffic, has improved security protection, and is considered more reliable than shared hosting. However, cloud hosting is usually more expensive than shared hosting—but not in all cases.
Tiiny.host is an example of cloud hosting.
Set Up Your Website
After you’ve secured your domain name and hosting, the next step is to set up your website.
Dynamic site hosts, particularly those hosting WordPress, either have WordPress pre-installed or offer one-click installation of popular web apps.
Static site hosts can sometimes be complicated to set up and run, often requiring the services of a web developer.
RECOMMENDED ARTICLE: Best practices for building static websites
But if you’re using Tiiny.host, your site is set up automatically.
See? Simple.
Uploading Website Files
Once your website is ready, you’ll need to upload it to your hosting server. This is typically done using an FTP (File Transfer Protocol) client, though some hosting companies offer a web-based file manager that you can use instead.
Tiiny.host’s Drag & Drop upload, as you’ve seen, is much simpler than the following steps.
Typical hosting services require FTP access.
- Access the hosting account’s control panel
- Set up FTP (File Transfer Protocol) access with passwords or ssh keys.
- Connect to the hosting server using an FTP client
- Upload website files to the server
Domain Name Configuration
To make your website accessible at your new domain name, you’ll need to configure your DNS (Domain Name Server) records. The only time this isn’t true is if you are hosting the site where you bought your domain name registration. In this case, your information is already pointed to the server.
Configuring domain name information typically involves manually setting your domain’s A record to point to your hosting server’s IP address. Your host provides the IP (Internet Protocol) address assigned to your server.
Then you must:
- Configure domain redirection (if necessary).
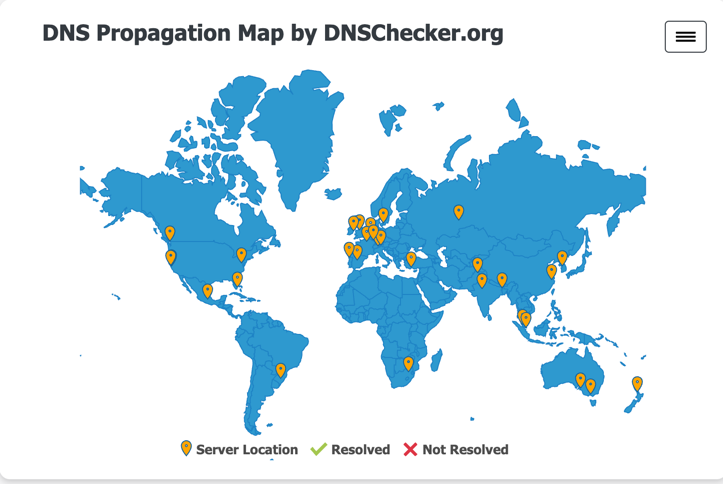
- Monitor DNS propagation status.
If this sounds intimidating, there are simple solutions.
- Tiiny.host offers automatic DNS setup for your link-name URL, or your custom domain name. Tiiny.host does the work.
- Entri.com is a third-party service that automates the DNS setup process.
The DNS propagation process mentioned above can be viewed graphically on a world map if you have the right app.
DNSchecker.org lets you input your IP number or domain name and tracks the DNS propagation for you.
Testing Your Website
After everything is set up, testing your website to ensure everything works correctly is important.
This includes checking that:
- all pages load correctly
- all links work
- the site looks good on different devices and browsers.
This process can take some time, depending on how large your site is.
Verify website files are accessible
Modern websites are responsive. This means that the web pages adjust themselves to any size of screen, from desktop to mobile.
Your job is to see that all your pages render well on desktop, tablet, and various mobile devices. You may need to borrow phones and tablets from others so you don’t need to buy them just for testing.
Test website functionality
Another testing duty is trying out your site on different browsers. Chrome, Safari, Edge, Firefox, and Opera browsers are popular, but there are others.
If your website breaks on a specific browser, you’ll need to do some troubleshooting to find a fix. This can be a time-consuming chore, but knowing your website will function for all your visitors is worth it.
Check for any errors or issues
A testing tool that developers use is available to anyone using Google’s Chrome browser. This tool is excellent at identifying web page problems.
The user interface is a bit crowded with many features and options, but I’ll show you how to access the main screen and look for any errors that may have crept into your project.
Looking in the far upper-right corner of Chrome, to the right of your picture, is a menu choice of three dots arranged vertically.
Choose that menu item, then look down the menu for “More Tools” and then “Developer Tools.”
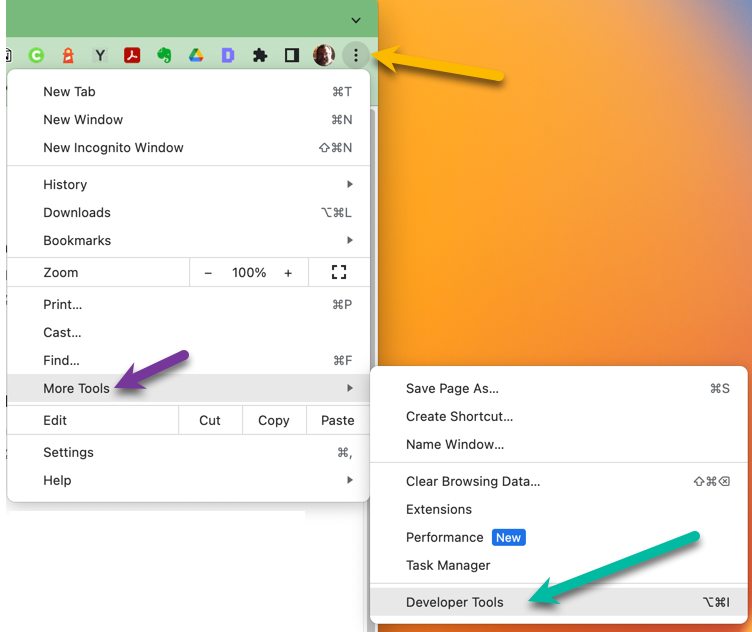
After choosing “Developer Tools,” you’ll see the main screen appear in a window on the right side of your browser window.
From here, click the “Console” tab and check for any errors listed there.
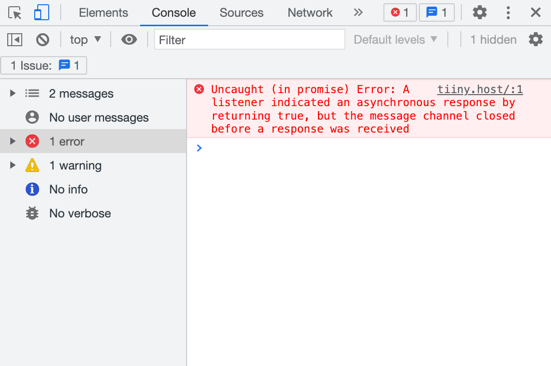
Use Google to search for an answer to your problem. You may find that there’s nothing to do because the error is insignificant.
Again, this is a developer’s tool, so it can get a little complicated. But at least you can see where your web page is stumbling or if it’s error-free.
Repeat this process after clicking on the “Network” tab, to make sure.
Now you’re good to go!
Install analytics like Google Analytics
For even more technical information about the visitors arriving at your website, install Google Analytics. Google Analytics is a free monitoring service that watches your website for traffic and visitors. This is a highly technical analyzer with a lot of moving parts. There is a steep learning curve to Google Analytics. But if you or a developer can install and monitor your site, you’ll learn just about everything there is to know about who’s coming and going.
Launch Your Website
It’s time to launch once you’re happy with your website’s looks and functions! This might involve removing any ‘under construction’ messages, submitting your site to search engines, and starting to promote your site.
Optimizing Your Website for Performance
Page loading speed
Aside from having top-quality content, page-loading speed is one of the most important factors in your website’s performance.
Visit these links to see just how fast your website is showing up for your visitors:
Content Delivery Networks
The closer your server is geographically to your visitor, the faster your site loads. But there is another way to ensure that your web pages are in close proximity to your worldwide audience.
A Content Delivery Network (CDN) stores copies of your website around the globe to reduce delays in transferring data from the server to the visitor. Use of a CDN is strongly recommended, especially for larger sites and those with lots of images and media.
Tiiny.host automatically uses a CDN to deliver your content to distant geographic locations.
Image optimization
Photographs and other images can be “heavy,” meaning the file size is large and slow to travel across the web. Heavy images must be optimized to load quickly. This involves compression.
Compressing an image means reducing the original file size significantly without losing much, if any, visual quality.
Some CDNs provide image compression as a standard feature. There are also many apps and websites that can compress your images for you, often for free.
RECOMMENDED ARTICLE: Speed Optimization for Static Websites
Mobile optimization
55% of website traffic comes from mobile devices. And over 92% of users access the internet using a mobile device. If your website is not optimized for mobile and doesn’t use a responsive design, you are alienating over half of your audience.
Google provides a Mobile Tester to examine your site for optimization.
Regular Maintenance and Updates
After your site is live, keeping it updated and secure is important. This might involve updating your software, plugins, and themes, regularly backing up your site, and monitoring your site’s performance and security.
It’s true: a long list of things must be maintained and updated on your website. But keeping it clean and shiny (and fast) is crucial.
Here are some maintenance and update duties:
- Updating software
- Security scans
- Content updates
- Fixing broken links
- Monitoring website performance
- Backing up the site regularly
- Checking for 404 errors and server redirects
- Removing spam comments
- Testing page speeds
- Checking any opt-in forms
- Scanning for vulnerabilities
- Repairs and fixes
- Browser compatibility testing
- Site speed
- Search engine optimization (SEO)
- Analytics
These things can be done over time, not all at once. Setting up a regular maintenance schedule helps a lot.
Next Steps
Based on your website requirements, it’s now up to you to choose your hosting service and join the millions of residents on the World Wide Web.
If this article raised any questions or comments, please contact Tiiny.host/help. No commitment is necessary. We’re glad to serve.
How to host a website FAQs
How can I host a website for free?
Many options are available for free website hosting. WordPress.com, Wix.com, Sites.Google.com, and Github.com.
Most services offer a freemium plan, in which you can test or have limited use of the service for free, then pay for any advanced features you may need.
Tiiny.host offers 7 days of free hosting, then low-cost plans after that.
How to host a website for dummies?
You may think you qualify as a dummy, but we don’t think so. Still, Tiiny.host offers the simplest way to host your website in three easy steps. Even dummies can do it ;)
How do I host my HTML code?
Almost any web host can support static HTML code. Tiiny.host offers easy static HTML code hosting at competitive rates.
How can I host an HTML page for free?
Tiiny.host offers 7 days of free HTML hosting before it’s necessary to purchase a subscription plan. More technical but completely free hosting services include WordPress.com, Wix.com, Sites.Google.com, and Github.com.

