
- Understanding Static Websites
- Dynamic websites
- Static websites
- Benefits of Static Websites
- Choosing a Static Site Generator (SSG)
- Preparing Your Static Website
- Selecting a Hosting Provider
- Deploying Your Static Website
- Next steps
We all have to start someplace. Static website hosting is no different. And once you’re set-up, it’s a smooth and efficient path to a blazingly fast web experience.
We’ll glance at the benefits of static sites, then head straight to the steps required to make it all happen.
Sound good?
Let’s go.
Understanding Static Websites
First off, let’s define a static website and how it differs from other types of sites.
All websites are generated from specific kinds of files. These files, such as HTML, CSS, and JavaScript, are combined to create the web page visitors see in their browsers.
Static and dynamic websites are two popular but quite different ways to send your web pages from the server to your site’s visitors.
Dynamic and static sites differ in how and when your pages are generated (created).
Dynamic websites
A dynamic website waits until your visitor has requested something from your site, then the web server generates a new page in real-time and delivers it to your visitor’s browser.
The generation process takes time; your visitor must wait until the page appears. This slows down your site but allows the server to do additional work that can provide additional features to your site.
Here’s a cmplete guide on how to host a dynamic website.
Static websites
A static website generates all its pages in advance and serves them immediately when called for. This process is very fast. Your pages appear almost instantly.
The disadvantages of going static are small. You can’t do any server-side processing to personalize or alter the web pages in any way. But the information sent to your users is the same every time and gets there rapidly.
RELATED ARTICLE: A Guide To Static Websites
Benefits of Static Websites
Several specific benefits are gained by taking the static site approach.
Speed
Static websites load faster, providing a better user experience. This lightning-fast delivery really counts for both SEO and user experience.
Security
With no databases or server-side code, static websites have a reduced risk of vulnerabilities, malware, and hacking attempts. You can’t hack a pre-generated web page.
Scalability
Static websites can easily scale up through Content Delivery Networks (CDNs), reducing server load and increasing availability.
Cost
Hosting static websites is usually cheaper than dynamic websites, as complex server infrastructure is unnecessary.
Maintenance
Static websites are easier to maintain due to their simple file structure and lack of server-side components.
Ideal use cases
Static websites are perfect for blogs, portfolios, PDFs, restaurant menus, documentation sites, and other scenarios where server-side processing isn’t required.
Choosing a Static Site Generator (SSG)
After you’ve written the content of your web pages, it’s time to generate the entire website before hosting it. Generating your static site means choosing a Static Site Generator (SSG).
SSGs are the engines that create static websites from page templates and content files. They interface with a Content Management System (CMS), where your content lives before the SSG becomes an HTML web page.
RELATED ARTICLE: What is a Static Site CMS?
Popular SSGs include Jekyll, Hugo, Gatsby, and Eleventy. Each has its own set of features and advantages.
When selecting an SSG, consider factors like ease of use, community support, themes, and available plugins. Experiment with a few options to find the one that best suits your needs.
Preparing Your Static Website
Before hosting your static website, follow these steps:
- Choose an SSG and install it on your computer.
- Create or select a template for your site’s design.
- Add your content, typically in Markdown or another simple format.
- Organize your site’s file structure for easy maintenance and updates.
- Configure necessary settings, such as permalinks and site metadata.
- Run your SSG to generate your static website files.
Selecting a Hosting Provider
To host your static website, you’ll need a hosting provider. Several options are available, ranging from traditional web hosts to specialized static site hosting services.
When selecting a hosting provider, consider factors like cost, ease of use, features, and performance. A side-by-side comparison of these providers will help you make a more informed decision.
Here are some popular choices:
Tiiny.host
A full-featured and simple-to-use static hosting site. Provides analytics, secure SSL, international CDN, custom domains, password protection, and a drag-and-drop interface for uploading your new website.
Netlify
Provides a comprehensive platform for static site hosting, continuous deployment, custom domains, and SSL certificates.
Amazon S3
A cost-effective option for hosting static websites on Amazon Web Services (AWS) infrastructure. Is a bit technical.
Vercel
Another platform focused on static sites and serverless functions, with custom domains and SSL support.
Deploying Your Static Website
Once you’ve chosen a hosting provider, follow their specific deployment instructions to get your static website online.
Here is the simple deployment method offered by Tiiny.host.
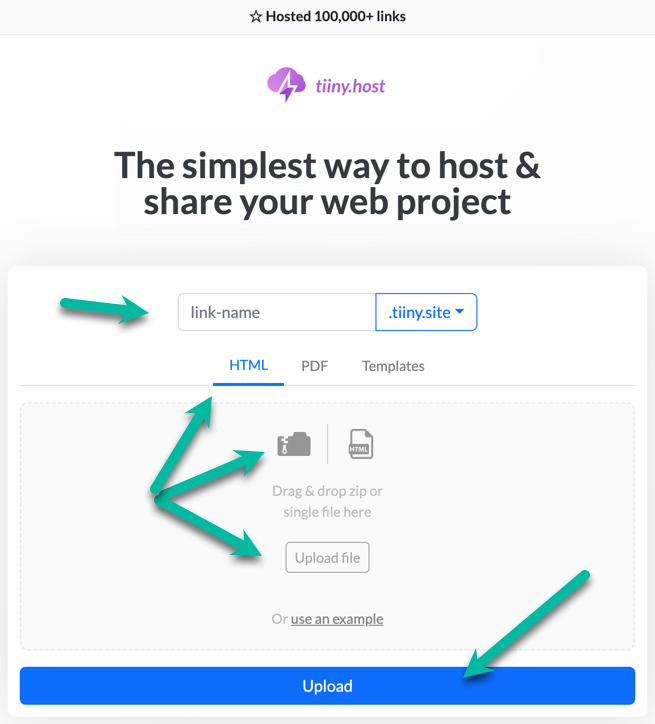
- Enter the link-name for your site.
- Choose HTML, then drag and drop or upload your zipped website file.
- Click the big blue “Upload” button.
That’s it.
I use Tiiny.host. I highly recommend it.
Next steps
Now that you know how to build and host your static website, it’s time to start!
Tiiny.host offers everything you need for sharing a professional or personal website on the internet.
Tiiny.host’s customer service is awesome! Contact them directly at Tiiny.host/help and see. They’ll answer your questions about their services, help you out with any problems, and explain any issues raised by this article.

