
- What is Notion?
- Exporting Your Notion Data
- Sharing to the Web
- Exporting Notion Pages
- Exporting to PDF
- Exporting to HTML
- Exporting to Markdown & CSV
- Next Steps
- How do I host my exported PDFs or HTML?
Notion is an amazing program that enables you to automate and present almost any document requirements you have. Use cases range from simple note-taking to database management. You can even host a website made from Notion pages—the ability to export HTML is built into the application. You can share on the web any live page you make in Notion. Notion is pretty impressive.
Once you’ve gotten into the habit of entering, importing, storing, and formatting your data in Notion, you’ll eventually want to share that information with others. To do this, you’ll need to export your pages.
In this article, I briefly overview what Notion can do. Then we’ll get into the business of how to export your data from Notion. We’ll start with simple web sharing and then move through the export options Notion provides.
Let’s get to it!
What is Notion?
Notion is a high-powered productivity application. With Notion, you can produce, manipulate, and present content in many ways. You can:
- Organize
- Plan
- Collaborate
- Create
The Notion app combines note-taking, task management, database creation, and collaborative workspaces.
The secret to all this flexibility is in its basic features.
Workspaces are the general spaces where all your data exists, broken down into a series of pages.
Pages are the areas you use to assemble and organize your information, just like a word processor offers a page to write upon.
Blocks are basic information units like text, images, videos, or links. These are added to the page where you can format them in almost any way you want.
Databases show on the page and allow you to organize, sort, filter, and link data. These are fully functional databases within your pages. Types of databases include:
- Tables
- Boards
- Lists
- Calendars
- Galleries
Templates are powerful and useful ways to start collecting and formatting your data professionally. They come built-in, or you can find free or paid templates designed by third parties. You can also create your own templates and save them for later use.
Collaboration features include real-time team activities and team member permissions. Share pages or entire workspaces with your team members. Assign tasks, leave comments, and track progress on shared projects.
Integration includes many popular applications like Google Calendar, Slack, PM tools, and other third-party apps and services. There is smooth and efficient communication between tools for a seamless workflow.
Notion is available across multiple platforms like Windows, MacOS, iOS, and Android.
Exporting Your Notion Data
As I said earlier, once you’ve entered and formatted your data in Notion, you’ll likely want to share or export it to others. Let’s look at the ways Notion offers this ability.
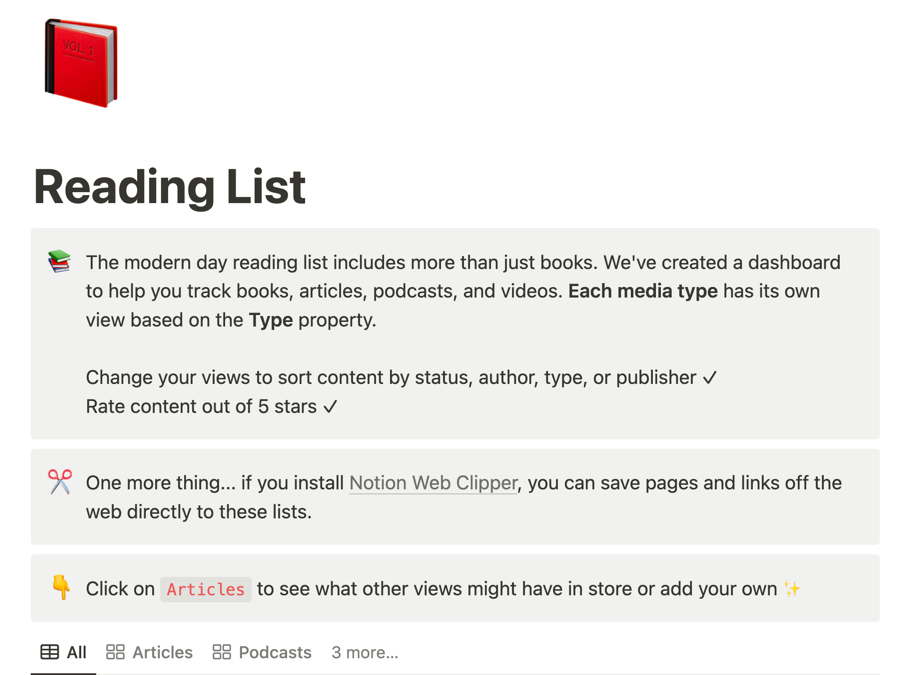
As an example, we’ll use a Notion template included in the standard app distribution. It’s called “Reading List.” This template will allow us to practice our sharing and exporting skills.
Sharing to the Web
One of Notion’s best features is that sharing of pages on the web is built-in and only a couple of clicks away.

All Notion pages have sharing and other features offered in the top right corner of your page. For sharing to the web, we use the “Share” button on the page you wish to share with someone.
A popup menu will appear:
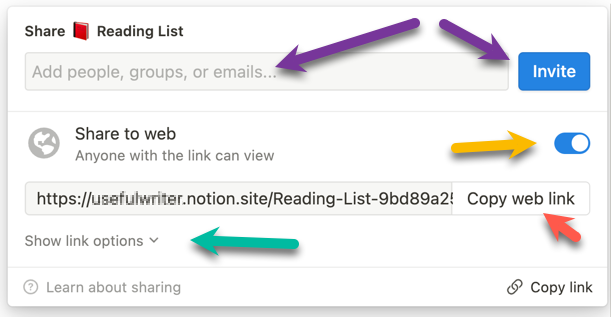
There are several things to do on this screen.
The purple arrow points to the button you click to share the page with those you’ve invited in the field to the left of the button. Since Notion allows you to identify people and groups in its collaborative tools, you can enter them here and then invite them with a click.
The yellow arrow points to the “Share to web” toggle switch. If it is off, click it to turn on sharing. This is important, or your page will not post to the web.
The red arrow shows where to copy the URL web address to share in email or other ways you use to communicate.
The green arrow points to a button that reveals even more sharing options. See these options below:
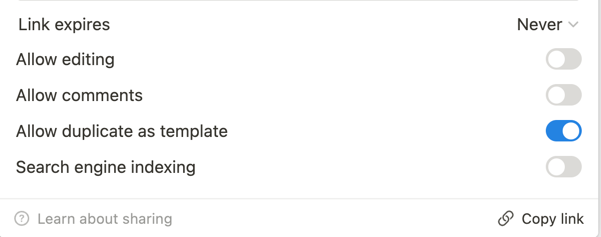
These are pretty self-explanatory. You can click the “Learn about sharing” button to find out more about them.
Once you’ve shared your page to the web, it will be available instantly to anyone you have permitted to see it. They simply paste the URL address into their browsers.
Exporting Notion Pages
The next three exporting options are accessed through the ellipsis menu at the top right of your page.

From the ellipsis button drop-down menu, choose the Export menu item:
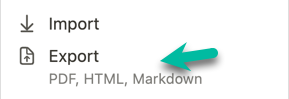
On the menu are the file types you can export. CSV is also available but does not show here.
Your next click takes you to the following menu. You get the popup menu below by clicking on the PDF menu (it may say HTML or Markdown & CSV).

Here you choose the file format for exporting. Clearly, you can choose PDF, HTML, or Markdown & CSV combined. Let’s look at each option.
Exporting to PDF
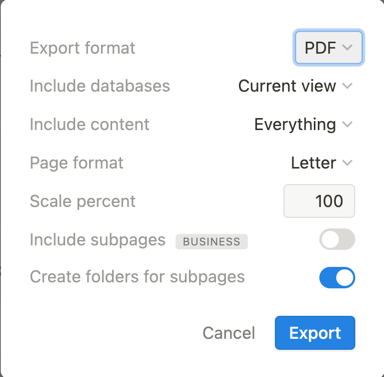
When exporting PDF, you make several choices. You’ll see similar choices for HTML and Markdown & CSV.
- Include Databases exports the current view as seen on your page or else everything in the database.
- Include Content gives you the choice of Everything or No images or files.
- Page Format includes typical international paper sizes, A4, A3, Letter, Legal, and Tabloid.
- Scale percent changes the visual size of your page, possibly to fit on the printed page.
- Include Subpages means including any pages you’ve linked to on your current page. There is no limit on the number of pages you can link to, so be sure to choose this option carefully based on the current page.
- Create folders for subpages exports the subpages into separate directory folders on your chosen storage location.
Once configured, all you need do is click export, save to your choice of locations in the file dialog which appears, and you have a PDF of your page, ready to use.
Exporting to HTML
HTML export format is very similar, but there are fewer menu choices.
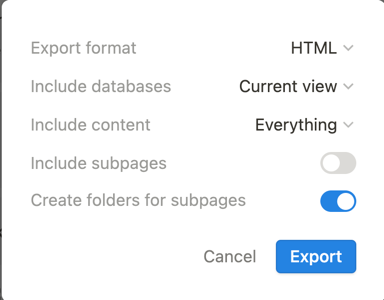
After exporting the HTML, you have a .zip compressed file with your HTML pages and images. If you unzip the file into a directory folder, you can drag the index.html file into your browser and see your page.
This zipped file is perfect for uploading to a static site hosting service such as Tiiny.host.
Exporting to Markdown & CSV
The Markdown & CSV popup is identical to the HTML popup. What changes is what you get at the end of the export process.
When you export to Markdown & CSV, you get both types of files. You get formatted Markdown pages (however many you exported) and also a Comma Separated Values (CSV) file of the database content. You can drag the CSV file only Excel or open it in Google Sheets, or any spreadsheet program that supports the CSV format.
Next Steps
Whether you share your page on the web or export to PDF, HTML, or Markdown & CSV, you’ve gotten a great introduction to the power of learning how to export your data from Notion. Notion export is especially valuable when using integrations and creating compelling data and documentation for your business dealings.
How do I host my exported PDFs or HTML?
Visit Tiiny.host for fast, secure, and easy hosting of your static files like HTML and PDF.
As a user of Tiiny.host myself, I can vouch for them. They’re great!
Once you visit the homepage at Tiiny.host, you are three simple steps from your project being live on the web.
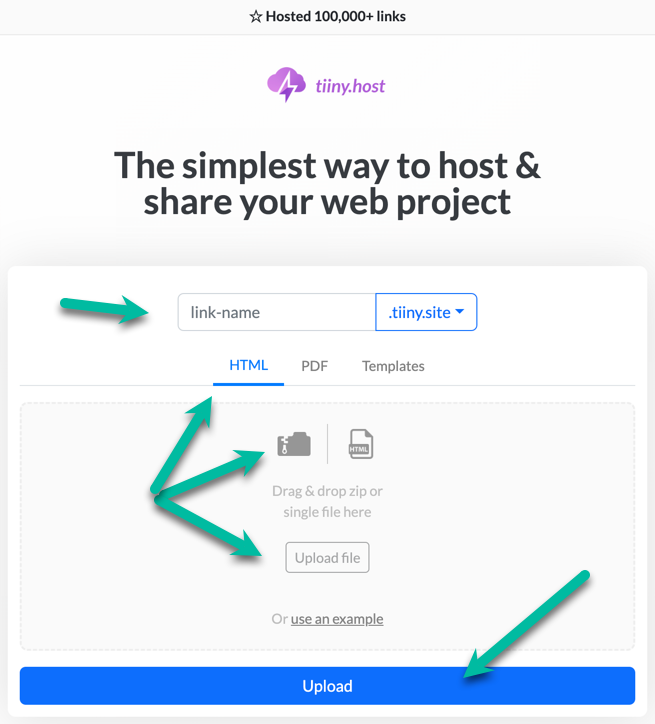
- Enter the link-name for your site.
- Choose HTML, then drag and drop or upload your zipped website file.
- Click the big blue “Upload” button.
That’s it! Simple, quick, and easy.
Tiiny.host offers everything you need for sharing a professional or personal file or website on the internet.
Tiiny.host’s customer service is awesome!
Contact them directly at Tiiny.host/help and see. They’ll answer your questions about their services and help you out with any problems. You can ask them to explain any issues raised by this article.
Go ahead. Give Tiiny.host a try.

