
- Introduction
- Step 1: Setting Up Your Workspace
- Step 2: Creating Your HTML File
- Step 3: Adding Content to Your HTML File
- Step 4: Creating Your CSS File
- Step 5: Adding Basic Styles to Your CSS File
- Step 6: Styling the Layout
- Step 7: Responsive Design
- Step 8: Testing Your Website
- Congratulations!
- Bonus code
- How do I host my website?
- That’s it!
Hey there! Whether you’re an aspiring web developer or just curious about how websites are built, you’ve come to the right place. In this blog post, you’ll learn how to create a simple, yet functional website using only HTML and CSS.
So, let’s dive in!
Introduction
Creating a website from scratch might seem like a daunting task, but it’s easier than you think. HTML (Hypertext Markup Language) and CSS (Cascading Style Sheets) are the building blocks of web development. HTML structures your content, while CSS styles it to make it visually appealing. By the end of this tutorial, you’ll have a basic understanding of how to create a website using these two essential tools.
Step 1: Setting Up Your Workspace
Before we get started, you’ll need a text editor to write your code. Some popular options are:
- Sublime Text
- Visual Studio Code
- Brackets
Once you’ve picked your favorite text editor, create a new folder on your computer called “my_website.” This is where we’ll store all our project files.
Step 2: Creating Your HTML File
In your “my_website” folder, create a new file named “index.html”. This will be your main HTML file. Open it in your text editor and start by writing the basic HTML structure, as shown below:
<!DOCTYPE html>
<html lang="en">
<head>
  <meta charset="UTF-8">
  <meta name="viewport" content="width=device-width, initial-scale=1.0">
  <title>My First Website</title>
  <link rel="stylesheet" href="styles.css">
</head>
<body>

</body>
</html>
This is the basic template for any HTML file. The <!DOCTYPE html> declaration defines the document type and version of HTML. The <html> element wraps the entire page, while the <head> element contains meta information, title, and links to external resources (like our CSS file). Finally, the <body> element will hold our page content.
Step 3: Adding Content to Your HTML File
Now that we have the basic structure in place, let’s add some content to our page. We’ll create a simple layout with a header, main content area, and a footer.
Add the following code inside the <body> element:
<header>
<h1>Welcome to My First Website</h1>
</header>
<main>
<section>
<h2>About Me</h2>
<p>Hi, I'm \[Your Name]! I'm learning how to create a website using HTML and CSS.</p>
</section>
<section>
<h2>My Projects</h2>
<p>Check back soon for updates on my latest projects!</p>
</section>
</main>
<footer>
<p>© \[Your Name] 2023. All rights reserved.</p>
</footer>
We’ve added a <header> element with an <h1> heading, a <main> element with two <section> elements (each containing an <h2> heading and a <p> paragraph), and a <footer> element with a copyright notice.
Step 4: Creating Your CSS File
It’s time to add some style to our page. In your “my_website” folder, create a new file named “styles.css”. This will be your main CSS file. Open it in your text editor and get ready to add some styles!
Step 5: Adding Basic Styles to Your CSS File
Let’s start by adding some basic styles to our page. We’ll begin with the body, headings, and paragraphs.
Create an empty “styles.css” file in the same directory as your index.html file. Add the following code to your “styles.css” file:
body
  font-family: Arial, sans-serif;
  line-height: 1.6;
  margin: 0;
  padding: 0;
}

h1, h2
  color: #333;
}

p
  font-size: 1rem;
}
Here, you’ve set a default font-family for the entire page, adjusted the line-height for better readability, and removed any default margin and padding. You’ve also styled your headings and paragraphs.
Step 6: Styling the Layout
Next, style your header, main content area, and footer. Add the following code to your “styles.css” file:
header {
  background-color: #f4f4f4;
  padding: 1.5rem 0;
  text-align: center;
}

main {
  display: flex;
  justify-content: space-around;
  margin: 2rem 0;
}

section {
  width: 45%;
}

footer {
  background-color: #f4f4f4;
  padding: 1rem 0;
  text-align: center;
}
You’ve added background colors and padding to your header and footer, centered the text, and applied a flexbox layout to the main content area. Each section now takes up 45% of the available width, with some space in between them.
Step 7: Responsive Design
Nowadays, it’s essential to make your website look good on different devices. To achieve this, you’ll use media queries to adjust your layout for smaller screens.
Add the following code to your “styles.css” file:
@media (max-width: 768px) {
  main {
    flex-direction: column;
    align-items: center;
  }

  section {
    width: 80%;
    margin-bottom: 2rem;
  }
}
This media query targets screens with a maximum width of 768px, changing the layout to a single column and adjusting the width and margin of each section.
Step 8: Testing Your Website
To see your website in action, open the “index.html” file in your favorite web browser. You should see a simple, responsive website with a header, two sections of content, and a footer. Resize your browser window to see how the layout adjusts for smaller screens.
Congratulations!
You’ve just created a basic website using HTML and CSS. While this is just the beginning, you now have a solid foundation to build upon. You can create even more impressive websites as you explore more advanced techniques and tools. Don’t be afraid to experiment, practice, and keep learning. Happy coding!
Bonus code
With the following single “index.html” file, you can view your website with the styles applied without needing a separate “styles.css” file. Just save the file and open it in your web browser to see the result.
Here’s the complete “index.html” file with the CSS styles embedded within the <style> tags inside the <head> element:
<!DOCTYPE html>
<html lang="en">
<head>
<meta charset="UTF-8">
<meta name="viewport" content="width=device-width, initial-scale=1.0">
<title>My First Website</title>
<style>
body {
font-family: Arial, sans-serif;
line-height: 1.6;
margin: 0;
padding: 0;
}
h1, h2 {
color: #333;
}
p {
font-size: 1rem;
}
header {
background-color: #f4f4f4;
padding: 1.5rem 0;
text-align: center;
}
main {
display: flex;
justify-content: space-around;
margin: 2rem 0;
}
section {
width: 45%;
}
footer {
background-color: #f4f4f4;
padding: 1rem 0;
text-align: center;
}
@media (max-width: 768px) {
main {
flex-direction: column;
align-items: center;
}
section {
width: 80%;
margin-bottom: 2rem;
}
}
</style>
</head>
<body>
<header>
<h1>Welcome to My First Website</h1>
</header>
<main>
<section>
<h2>About Me</h2>
<p>Hi, I'm \[Your Name]! I'm learning how to create a website using HTML and CSS.</p>
</section>
<section>
<h2>My Projects</h2>
<p>Check back soon for updates on my latest projects!</p>
</section>
</main>
<footer>
<p>© [Your Name] 2023. All rights reserved.</p>
</footer>
</body>
</html>
How do I host my website?
Visit Tiiny.host for fast, secure, and easy hosting of your new website.
Once you visit the homepage at Tiiny.host, you are three simple steps from your project being live on the web.
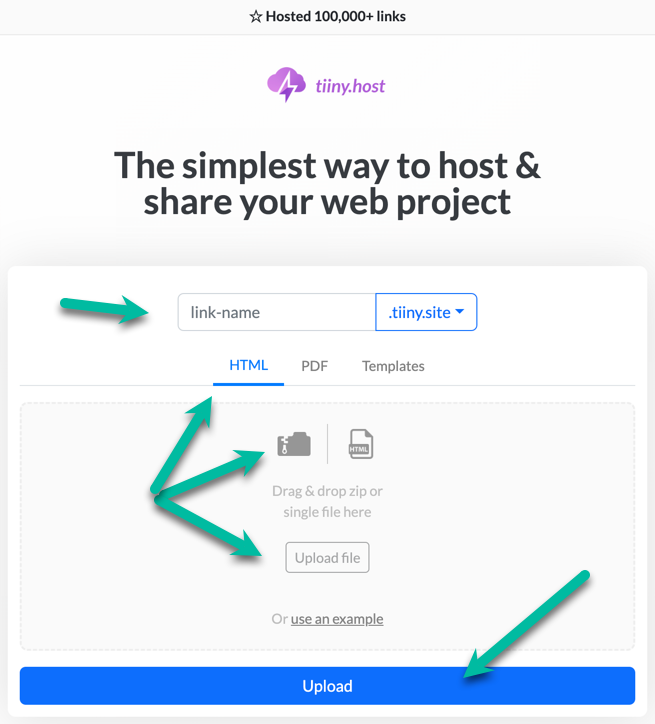
- Enter the link name for your site.
- Choose HTML, then drag and drop or upload your zipped website file.
- Click the big blue “Upload” button.
That’s it!
Next steps
Tiiny.host offers everything you need for sharing a professional or personal website on the internet.
Tiiny.host’s customer service is awesome! Contact them directly at Tiiny.host/help and see. They’ll answer your questions about their services, help you out with any problems, and explain any issues raised by this article.
