
- Step 1: Understand the Benefits of PWAs
- Step 2: Analyze Your Website Structure
- Step 3: Create a Web App Manifest
- Step 4: Implement a Service Worker
- Step 5: Test Your PWA
- As Promised: Converting a CMS-based Website to a PWA
- How to Host Your Static PWA
- Next steps
Looking for a better approach to your current website? Are you ready to take it to the next level?
Convert it into a Progressive Web App (PWA).
Relax. It’s easier than you think. We’ve got your back.
In this post, we’ll walk you through the steps to convert your static website into a PWA.
Let’s get to it.
Step 1: Understand the Benefits of PWAs
First things first. Let’s talk about how Progressive Web Apps are so great—and why you may want one.
PWAs offer fast, engaging experiences like native apps while retaining the flexibility of the web.
Here are a few benefits:
- PWAs work offline, meaning your visitors can access your content even without an internet connection.
- They load faster than traditional websites, providing a better user experience.
- They’re installable, making it easy for visitors to add your site to their home screen and launch it just like a native app.
Step 2: Analyze Your Website Structure
Before we dig into the technical stuff, let’s take a closer look at your website’s current structure.
Are you using a custom-built static site? Or maybe a content management system (CMS) like WordPress?
Depending on your site’s framework, your approach will vary.
That’s fine. We’ll cover both scenarios.
Just wait for it. Or, skip ahead. You choose.
Step 3: Create a Web App Manifest
A Web App Manifest is the file that tells the browser, “Hey, this is a PWA.”
It’s a JSON file that provides metadata about your PWA, like its name, description, icons, and more.
Here’s a simple example to get you started:
{

    "name": "Your Awesome PWA",
    "short_name": "Awesome PWA",
    "description": "A fantastic example of a PWA.",
    "start_url": "/",
    "display": "standalone",
    "background_color": "#ffffff",
    "theme_color": "#000000",
    "icons": [
        {
            "src": "/icons/icon-192x192.png",
            "sizes": "192x192",
            "type": "image/png"
        },

        {

            "src": "/icons/icon-512x512.png",
            "sizes": "512x512",
            "type": "image/png"
        }
    ]
}
Once you’ve created the file, save it as manifest.json and upload it to the root of your website.
Don’t forget to create your icons and adjust the values to match your site’s branding and design. (Yeah, there’s homework.)
Next, add the following code to your existing HTML files’ <head> section. This links to the manifest:
<link rel="manifest" href="/manifest.json">
Step 4: Implement a Service Worker
A service worker is a JavaScript file that runs code in the background, separate from your web page.
It does the heavy lifting—it’s the magic behind PWAs’ offline functionality and performance improvements.
To create a service worker, follow these steps:
- Create a file named service-worker.js and place it in the root of your website.
- Add the following code to your service-worker.js file:
self.addEventListener('install', (event) => {
    event.waitUntil(
        caches.open('my-cache').then((cache) => {
            return cache.addAll([
                '/',
                '/index.html',
                '/styles.css',
                '/scripts.js',
                '/images/logo.png',
                // Add any other assets you want to cache
            ]);
        })
    );
});

self.addEventListener('fetch', (event) => {
    event.respondWith(
        caches.match(event.request).then((response) => {
            return response || fetch(event.request);
        })
    );
});
This code sets up basic caching for your website’s assets. Feel free to customize it to fit your needs.
Caching? Caching saves files for reuse later. This speeds things up.
Next, register the service worker in your main JavaScript file or inline within your HTML.
Add the following code:
if ('serviceWorker' in navigator) {
    navigator.serviceWorker
        .register('/service-worker.js')
        .then((registration) => {
            console.log('Service Worker registered successfully:', registration);
        })
        .catch((error) => {
            console.log('Service Worker registration failed:', error);
        });
}
And that’s it. Your service worker is up and running.
Step 5: Test Your PWA
Now your PWA is complete!
But before you celebrate, it’s quite important actually to test it to ensure everything works as it should.
Here are a few ways to do that:
- Use Google Chrome’s Lighthouse tool to audit your site and check PWA compliance.
- Try installing your PWA on your device to see if it works as expected.
- Test your site offline to ensure your service worker is caching and serving assets correctly.
As Promised: Converting a CMS-based Website to a PWA
If you’re using a CMS like WordPress, you can still convert your site to a PWA.
Look for the plugins that help generate a web app manifest and service worker for you.
For WordPress, popular choices include Super Progressive Web Apps and PWA for WP & AMP. (For other platforms, check their plugin libraries.)
Install one of these plugins, follow the setup instructions, and voilà—you’ve got yourself a PWA.
How to Host Your Static PWA
Once your PWA is ready, you’ll want to host it somewhere good.
Tiiny.host provides fast, secure, and easy hosting of your static PWA.
As a user of Tiiny.host myself, I can vouch for them. They’re great!
Here’s how it works:
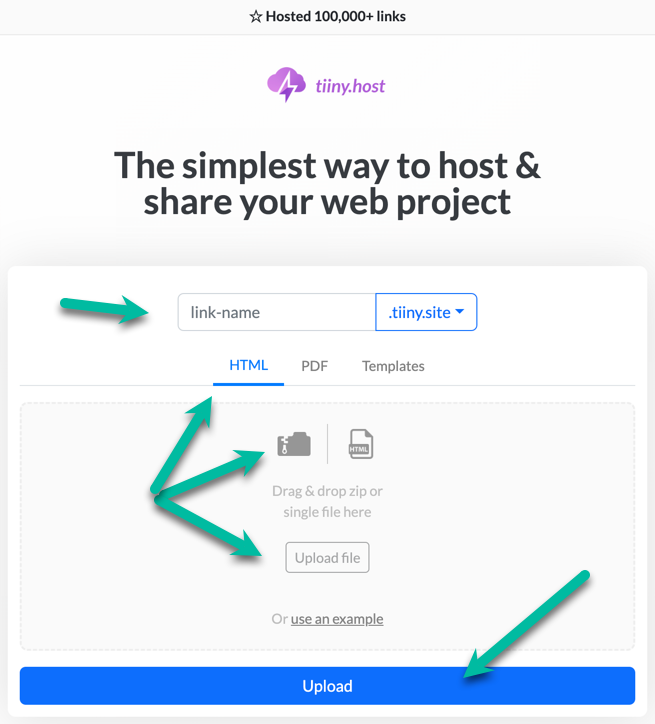
- Visit Tiiny.host and enter the link-name for your site.
- Choose HTML, then drag and drop or upload your zipped website file.
- Click the big blue “Upload” button.
And that’s all there is to it!
You’re now ready to share your PWA with the world.
Next steps
Tiiny.host offers everything you need for sharing a professional or personal website on the internet.
Tiiny.host’s customer service is awesome! Contact them directly at Tiiny.host/help and see.
They’ll answer your questions about their services, help you out with any problems, and explain any issues raised by this article.

