
- Why use Webflow?
- Overcoming Common Challenges of Self-Hosting Your Webflow Site
- Step-by-Step Guide to Self-Hosting Your Webflow Site
- Why Tiiny.host Is Perfect for Hosting Webflow Exports
- Tools & Resources for a Smooth Transition
- FAQ: Webflow Self-Hosting
Want to use Webflow’s powerful design tools but prefer hosting your site somewhere else? You’re not alone.
Many designers love Webflow’s no-code builder but need the flexibility, cost savings, or control of external hosting.
The good news: you can export your Webflow site and host it wherever you like. Here’s how to do it step by step.
Why use Webflow?
Webflow began in 2013 as a no-code solution for designing interactive media such as websites and mobile apps. As it grew in popularity, Webflow added Content Management System (CMS) capabilities, such as those at the core of WordPress and Drupal.
While WordPress still powers over 40% of all websites, Webflow has rapidly become the web’s top no-code site builder.
Webflow’s features include visual HTML and CSS editing through a drag-and-drop interface, support for professional design and prototype tools such as Figma, an integrated CMS, fully integrated hosting, SEO optimization, and many others.
Webflow SEO & Performance Benefits
Webflow’s managed hosting isn’t just about convenience — it’s also optimized for SEO and Core Web Vitals:
- Fast load speeds: Global CDN (Fastly + CloudFront) reduces LCP and TTFB delays.
- Automatic SSL: Every site is HTTPS-secure, boosting trust and rankings.
- Clean code & semantic HTML: Improves crawlability for search engines.
- Built-in SEO tools: Customizable meta titles, descriptions, Open Graph tags, and automatic XML sitemaps.
- Responsiveness: All Webflow templates are mobile-optimized by default, improving mobile rankings.
This makes Webflow a strong choice if ranking well on Google is a priority.
Migrating to Webflow Hosting
Already have a site hosted elsewhere? Moving to Webflow can simplify your workflow — but it pays to follow a proper migration plan.
Quick Migration Checklist:
- Audit your site: Gather all pages, images, and blog posts.
- Rebuild or import: Recreate the site in Webflow Designer or use CMS collections for dynamic content.
- Set up redirects: Map old URLs to new ones to avoid SEO losses.
- Connect your domain: Update DNS settings to point to Webflow.
- Test before launch: Check pages, links, and forms before going live.
Following this process will ensure a smooth transition with minimal downtime or ranking fluctuations.
When NOT to Use Webflow Hosting
Webflow hosting is powerful, but it isn’t the best fit for everyone. Consider alternatives if:
- You need custom server-side code (e.g., PHP, Node.js).
- You run large eCommerce stores with advanced requirements beyond Webflow’s product limits.
- Your team requires live chat or phone support — Webflow currently offers only email support.
- You’re on a tight budget and comfortable with DIY setups like WordPress + shared hosting.
Being clear on these limitations helps you avoid surprises later.
Alternatives to Webflow Hosting
If Webflow hosting doesn’t suit your needs, here are some solid alternatives:
- WordPress (Self-Hosted): Full control, thousands of plugins, great for content-heavy sites.
- Squarespace / Wix: Beginner-friendly, all-in-one platforms with simpler learning curves.
- Static Site Hosts (Netlify, Vercel, Tiiny Host): Great for developers or those who want fast, secure static sites with near-zero maintenance.
💡 Looking for a lightweight alternative? Check out our guide on hosting a static site with Tiiny Host — you can go live in under two minutes.
Webflow Hosting Pricing in 2025 (Detailed Breakdown)
Webflow’s pricing has stayed competitive, but it’s worth understanding exactly what you’re getting for your money — especially in 2025 as competitors roll out new offers.
| Plan | Monthly (Annual Billing) | Key Features | Best For |
|---|---|---|---|
| Free | $0 | webflow.io subdomain, limited pages | Testing, prototypes |
| Basic | ~$14 | Custom domain, no CMS | Simple static sites |
| CMS | ~$23 | 2,000 CMS items, editor roles | Blogs, portfolios |
| Business | ~$39 | 500k monthly visits, 10,000 CMS items | Small–medium businesses |
| Enterprise | Custom | SLAs, security audits, dedicated support | Large-scale organizations |
Pro tip: Annual billing saves around 20% compared to month-to-month. If you’re building a long-term project, lock in the annual plan to cut costs.
Overcoming Common Challenges of Self-Hosting Your Webflow Site
Hosting your Webflow site outside of Webflow’s native hosting can give you more flexibility, lower costs, or help you meet specific client requirements — but it does come with some trade-offs. Fortunately, all of these challenges have straightforward solutions.
1. Replacing Webflow CMS Functionality
When you export your Webflow project, you lose access to Webflow’s built-in CMS. This means that if your site relies on collections for blogs, case studies, or product pages, those items become static HTML pages in your exported site.
How to handle this:
- Use a headless CMS like Contentful, Sanity, or Netlify CMS if you still need dynamic content.
- If your site doesn’t need frequent updates, you can manage content manually by editing and re-exporting in Webflow.
- For developers, integrating a static CMS can keep your workflow almost as seamless as Webflow’s native CMS.
Recommended Resource: What is a Static Site CMS?
2. Handling Form Submissions Without Webflow Forms
Another feature you lose after export is Webflow’s integrated form handling. You’ll need a new way to process contact form submissions.
Workarounds include:
- Third-party form services: Use tools like Formspree, Basin, or Getform. They let you receive submissions by email and often include spam protection.
- Custom server scripts: If you’re using a VPS or custom host, you can process form data with PHP, Node.js, or any backend language.
- No-code automation tools: Connect forms to Zapier or Make (formerly Integromat) for automated responses or database storage.
3. Managing Updates After Export
Unlike a natively hosted Webflow site, updates are not instant after you export. Each time you make design changes in Webflow, you’ll need to re-export and re-upload your files.
Best practices:
- Batch your updates to avoid frequent manual uploads.
- Keep your exported files organized in a versioned folder system (e.g.,
site-v1.2.zip). - Use a Git repository or cloud storage to track changes if working with a team.
Step-by-Step Guide to Self-Hosting Your Webflow Site
Ready to host your Webflow project elsewhere? Here’s a complete, beginner-friendly workflow to get your site live.
Step 1: Choose Your Hosting
Look for a host that supports static file hosting — meaning it can serve HTML, CSS, JavaScript, and images.
Options include:
- Static site hosts: Tiiny.host, Netlify, Vercel (simple and cheap/free for small projects).
- Traditional web hosting: Shared hosting or VPS from providers like Bluehost, Hostinger, or DigitalOcean.
- Cloud storage + CDN: AWS S3 + CloudFront, Google Cloud Storage, or Cloudflare Pages for advanced setups.
Our Recommendation: Tiiny.host — the easiest way to host static Webflow exports in just three steps.
Step 2: Connect Your Domain
Once you’ve selected a host:
- Log in to your domain registrar (e.g., Namecheap, GoDaddy, Google Domains).
- Update DNS settings to point to your hosting provider’s IP or nameservers.
- Wait for DNS propagation (usually 15 minutes to 24 hours).
Many hosts have one-click domain connect wizards, so you may just need to paste your domain name and confirm ownership.
Step 3: Install an SSL Certificate
An SSL certificate ensures your site loads securely over HTTPS — which is crucial for user trust and SEO.
- Most modern hosts (including Tiiny.host) offer free SSL certificates through Let’s Encrypt.
- If your project requires advanced SSL features (wildcard domains, EV certificates), you can purchase one separately.
- Enable HTTP → HTTPS redirects to force all traffic through the secure version.
Step 4: Export Your Webflow Site
To export from Webflow:
- Log in to Webflow and open the project.
- Click the Settings icon in the left panel.
- Go to Export Code and click Prepare Zip.
- Download the full .zip file, which includes your HTML, CSS, JS, and image assets.
Tip: Always export the latest version of your site after finalizing changes.
Step 5: Upload Files to Your Host
How you upload depends on your hosting provider:
-
Tiiny.host: Drag & drop your
.zipfile into the uploader, choose a link name, click Upload — your site is live in seconds. - Traditional hosts: Use FTP (FileZilla) or a file manager in your control panel to upload your site folder.
- Cloud/CDN hosts: Deploy via CLI tools or connect to a Git repository.
Step 6: Test Your Live Site
Before sharing the link publicly:
- Click through every page and check for broken links.
- Verify that images load correctly and fonts are displayed as expected.
- Test forms to ensure they submit properly (if configured).
- Check both desktop and mobile versions.
- Use tools like PageSpeed Insights to check performance.
Why Tiiny.host Is Perfect for Hosting Webflow Exports
Unlike complex hosting setups, Tiiny.host is built for simplicity:
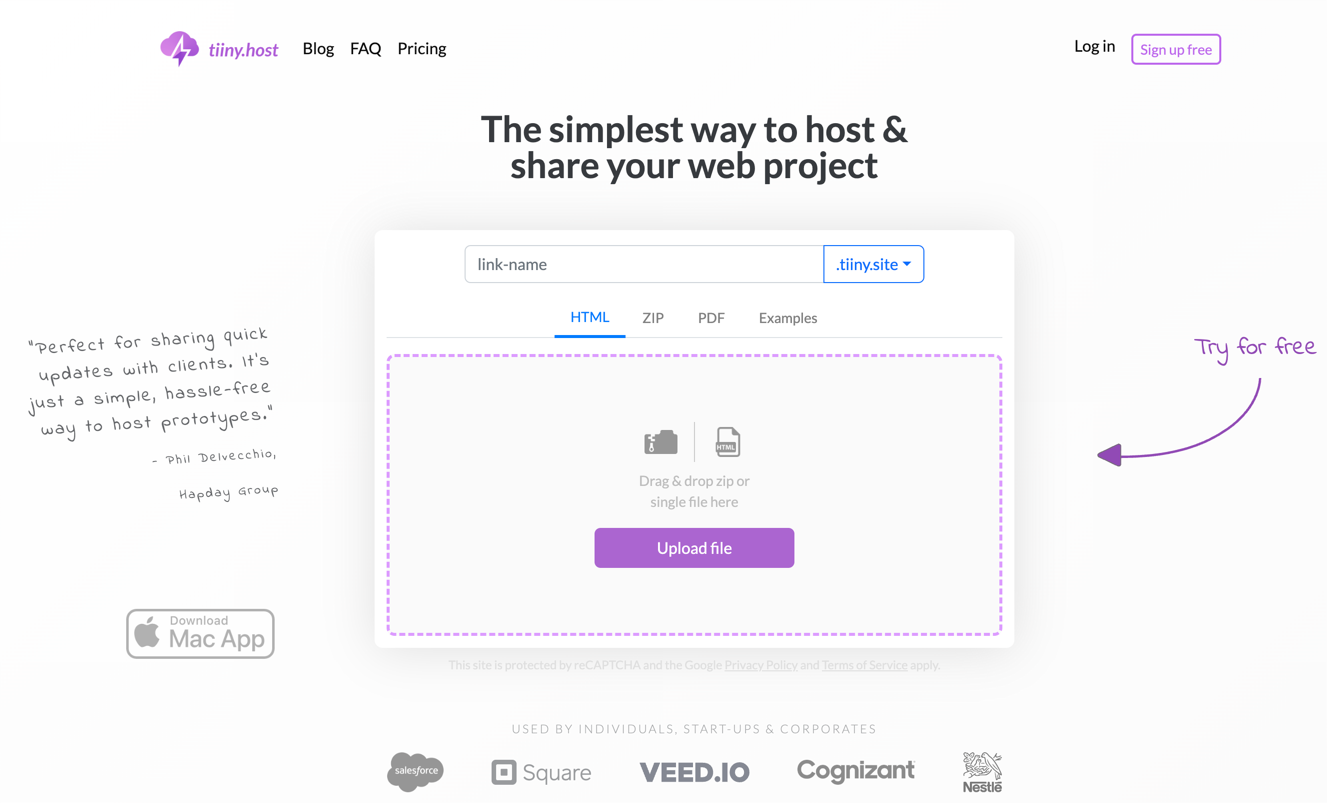
-
3-step upload process: Name your site, drop your
.zip, and click upload. - Fast, global CDN: Your site is distributed worldwide for fast load times.
- Free SSL included: Your site is secure by default.
- Custom domains supported: Use your own branded URL for a professional look.
- Affordable plans: Start free, upgrade later for analytics, password protection, and more.
Try Tiiny.host Free: Get your Webflow export online in under 2 minutes — no technical skills required.
Tools & Resources for a Smooth Transition
- How to Host a Website – Beginner’s guide to website hosting.
- Static Website Hosting: A Beginner’s Guide – Learn why static hosting is fast and secure.
- Webflow vs WordPress – Compare two of the most popular website platforms.
FAQ: Webflow Self-Hosting
What hosting do I need for a Webflow export?
Any host that supports HTML, CSS, and JavaScript will work. Tiiny.host, Netlify, or shared hosting plans are good options.
Will my CMS still work?
No. Exported Webflow sites are static. You’ll need to integrate a third-party CMS if you want dynamic content.
Do I lose SEO features when I self-host?
No, but make sure to upload all files (including sitemap.xml and robots.txt) and set up redirects if URLs change.
How often do I need to re-upload?
Anytime you make changes in Webflow. Consider batching updates to minimize work.

