- Steps to Password Protect Your PowerPoint Presentation
- FAQs: How to Password Protect Your PowerPoint Presentation
PowerPoint presentations often contain sensitive information, and protecting this information is essential. Whether it’s a business proposal, a confidential project, or personal data, adding a password to your PowerPoint file ensures that only authorized people can access it. This guide will show you how to password protect your PowerPoint presentation, regardless of the device or version you’re using.
Password protection offers several benefits:
- Security: Keeps unauthorized users from accessing your presentation.
- Confidentiality: Ensures sensitive data remains private.
- Professionalism: Demonstrates that you value data integrity and security.
Steps to Password Protect Your PowerPoint Presentation
If you’re using PowerPoint via Microsoft 365 online, note that the online version does not natively support password protection. However, you can download the presentation and share it online using Tiiny.host and add protection through Tiiny host as well.
Using Tiiny Host
- Go to Tiiny Host
- Upload Your PowerPoint File as PDF
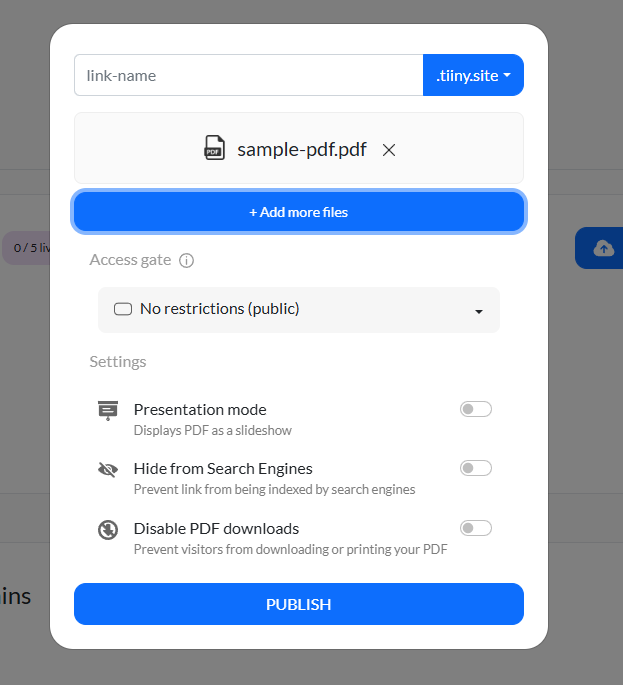
- Now is the crucial step to secure your file, there is an option of ‘Access Gate’ which is set to ‘No Restrictions’ by default
Change to the option that says: Password protected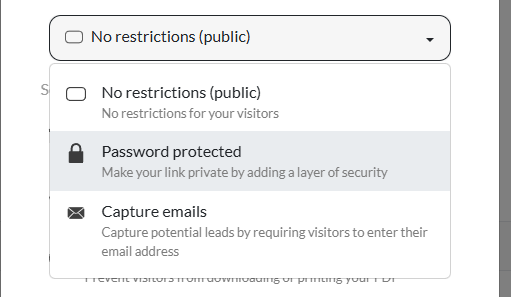
- Type in the password of your choice
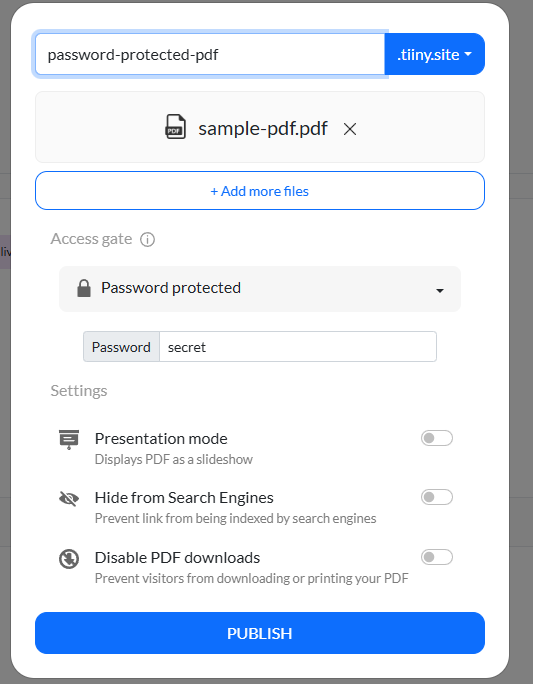
- Give a name to your link and hit publish
You can further add customizations of disabling the ability to download the file, collecting emails from he visitors or even checkout the analytics if you upgrade to one the Tiiny Host Pro plans. Have a quick look at what plan suits you the best.
Once uploaded, Tiiny Host will create a unique URL for your presentation. This is the link you can share with your intended audience.
Using Microsoft PowerPoint
When using Microsoft PowerPoint, sharing presentations can be cumbersome since you need to send the file to each recipient manually.
Additionally, once the file is shared, it cannot be updated without resending it. In contrast, Tiiny Host simplifies this process by providing a single link that can be updated at any time, ensuring your audience always has access to the latest version.
- Open Your Presentation. Ensure you have completed all your edits before setting up any protection.
- In the top left corner, click on File and select Info from the options in the sidebar.

- Under Info, you will see a button that says Protect Presentation. Click on it and select Encrypt with Password.
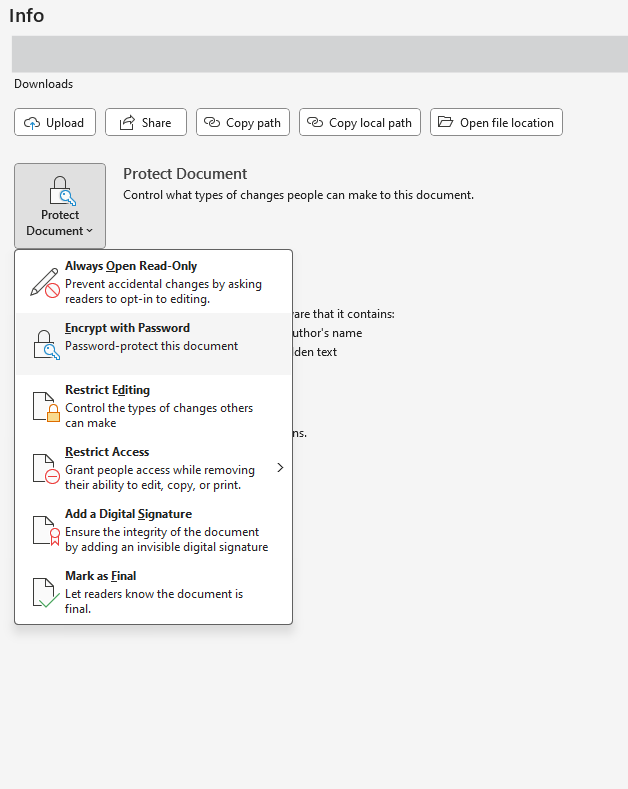
- A prompt will appear asking you to enter a password.
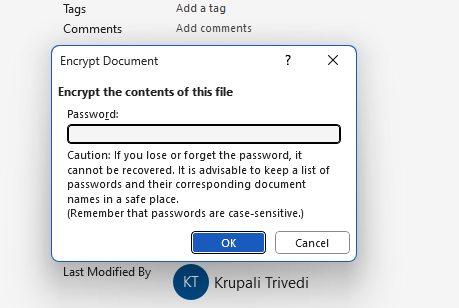
- After you’ve set the password, click OK, and then save your presentation. Your PowerPoint file is now password-protected.
Important: Remember, Microsoft PowerPoint does not allow for password recovery, so make sure you store your password securely.
Sharing Your Password-Protected PowerPoint Presentation
Once your presentation is uploaded and password protected, you can share the link and password with your intended audience. Follow these steps:
- Share the Link: Copy the link generated by Tiiny Host and share it with your audience via email, messaging apps, or social media.
- Provide the Password: Along with the link, you will need to send the password you set for accessing the presentation. This can be done securely via a private message or in a password manager tool.
- Remind Recipients to Keep the Password Secure: Ensure that your recipients understand the importance of keeping the password safe.
Tips for Securely Sharing PowerPoint Presentations
-
Use Strong, Unique Passwords
Both the PowerPoint password and the Tiiny Host password should be strong and unique. A good password typically contains a mix of letters, numbers, and symbols. -
Password Managers
If you have trouble remembering passwords, consider using a password manager. Password managers securely store and auto-fill your passwords for easy access. -
Limit Access and Permissions
Consider limiting who has access to your presentation. If you use Tiiny Host, make sure only trusted individuals receive the password. -
Test Access
Before sharing the link with a larger group, test the password protection by accessing the file yourself and ensuring that the password is required.
FAQs: How to Password Protect Your PowerPoint Presentation
Can I password protect specific slides within a PowerPoint presentation?
Most platforms do not offer an option to password protect individual slides within a presentation. The password protection applies to the entire file. If you want to restrict access to certain content, consider splitting your presentation into multiple files, each with its own password protection.
How can I share a password-protected PowerPoint without sending the password insecurely?
Consider using a secure communication platform, such as encrypted email, or a password manager to share passwords. Avoid sending passwords over unsecured channels like plain text emails or public messaging services. Alternatively, you can share the password in person or through a secure chat application.
Is it safe to use third-party tools to remove or recover passwords for PowerPoint files?
While some third-party tools claim to recover lost passwords, they often come with risks. These tools may be ineffective or compromise the security of your file. If you must use them, ensure that they are from trusted and reputable sources, and always back up your original files before attempting recovery.

