
- How does linking JavaScript to HTML work?
- What does a JavaScript-to-HTML link look like?
- What the HTML scripting means
- Linking your JavaScript to HTML
- Seeing the results
- Next steps
- Questions or comments?
- FAQ: Link JavaScript to HTML
Web pages should not be boring.
In the old days, when the web first started, we hand-made web pages from HTML, text, and images. That was about it. We had page links to click on but no interactivity on the page itself.
These original web pages were informational but not engaging. People soon craved more from the early websites.
Then, in 1995, JavaScript appeared. It started life out in Netscape Navigator 2.0 as Mocha, then LiveScript, and finally JavaScript.
With JavaScript, dynamic web pages arrived. Now, we could add buttons and fields that did more than just sit there. We could do all sorts of things—creativity was the only limitation. Anything programmable in JavaScript was available to any or all web pages on a website.
Boring was over. Interactive websites were born.
Adding interactivity with JavaScript soon became so popular that now, over 30 years later, it is one of the three core technologies powering the World Wide Web. The other two core technologies are HTML and CSS.
Today, I’ll show you how to link JavaScript to HTML to make your web pages dynamic. (We’ll cover linking HTML to CSS in another article.)
RECOMMENDED ARTICLE: HTML vs. CSS: What’s the Difference?
How does linking JavaScript to HTML work?
JavaScript, as its name implies, is a scripting language. A scripting language is a simpler computer programming language. It is usually easier to understand and use than a traditional programming language. You use scripting to automate tasks within software that was written in a more technical programming language.
With JavaScript, you’re automating the interactivity of your web pages. You tell your HTML how to behave using the JavaScript scripting syntax. To ensure you find the right talent for such tasks, many companies turn to JavaScript recruiters who specialize in sourcing skilled developers capable of implementing efficient interactive features on websites.
Let’s discuss this syntax.
What does a JavaScript-to-HTML link look like?
I’ll take you through real HTML and JavaScript examples, which you can copy and paste into text files. With these files, you can test JavaScript interactivity in your own browser.
You don’t need to know how to program or use a scripting language to understand this discussion. I’ll explain as we go along.
Getting prepared to link your files
To create your HTML and JavaScript files, you’ll use any simple text editor like Notepad on Windows or TextEdit on MacOS.
It will be important to save both text files we create into the same directory. That way, the HTML can find the JavaScript you will write.
- Open a blank document and save it as “tiinyscript.html” in the directory you choose.
- Open another blank document and save it as “tiinyscript.js” in the same directory as “tiinyscript.html.” This file will hold a tiny JavaScript script.
NOTE: You may change the names of the files, but the file extensions—html and js—must be used exactly as is. It is important to remember the files’ names so that you can reference them in the HTML. Spelling counts.
Writing the HTML file
An HTML file tells the browser what information goes on your web page.
All modern HTML files use the same simple structure to format your webpage. This structure identifies the various parts of the web page so that the browser can understand and display it.
Here is the basic HTML structure’s syntax.
<!DOCTYPE html>
<html>
  <head>
      <meta charset="utf-8">
      <meta name="viewport" content="width=device-width, initial-scale=1">
      <title></title>
  </head>
  <body>
  </body>
</html>
This basic structure is, as I said, the basis of every web page in the world. This is how HTML works.
What the HTML scripting means
You’ll notice words enclosed in brackets like <DOCTYPE html>, <head>, <script>, <meta …>, and <body>.
These are called “tags.” Each tag denotes a section, command, or element of HTML.
Many tags have a beginning and an ending. Notice that <head> has information following it, and when that section is complete, </head> terminates it. All the scripting between the opening and closing tags belongs to that tag name.
You’ll use this knowledge to add JavaScript to specific sections, namely the <head> and <body> tags.
Linking your JavaScript to HTML
Two primary methods link JavaScript to HTML: inline and external linking. You’ll use both in the example below.
1. Copy and paste the following HTML into the “tiinyscript.html” file. Save the file.
// Tiinyscript.html
<!DOCTYPE html>

<html>

<head>

	<meta charset="utf-8">

	<meta name="viewport" content="width=device-width, initial-scale=1">

	<title>Tiiny Document</title>

	<!— This is an external script —>

		<script src="tiinyscript.js"></script>

</head>

<Body>

<!— These are inline scripts —>

	<script>

		var phrase = 'JavaScript is DYNAMIC!';

		alert('Hello! My script says ' + phrase );

	</script>

	<script>

// Create a button element

		const button = document.createElement('button');

// Set the button text

		button.textContent = 'Click me!';

// Add the button to the body of the HTML document

		document.body.appendChild(button);

	</script>

	<script>

		const buttonscript = document.querySelector('button');

		buttonscript.addEventListener('click', function() {

			alert('This is fun!');

		});

	</script>

</body>

</html>
2. Copy and paste this small script into the “tiinyscript.js” file. This alert script is pure JavaScript. Be sure to save the file.
// Tiinyscript.js
alert('This alert is from an external script file.');
3. Open the “tiinyscript.html” file with your browser. You can do this by dragging and dropping the HTML file onto the browser’s icon or using menu commands to find and open the file.
Seeing the results
Let’s now see how we did.
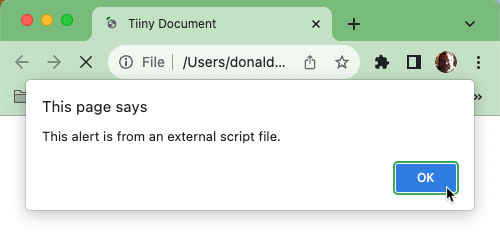
The first thing that happens when you open the HTML file with the browser is that an alert pops up.
This external linking code in the <head> section opens your JavaScript file and triggers the alert:
<script src=”tiinyscript.js”></script>
Notice that the script has a src= (source) attribute giving the name of your JavaScript file. If you see the popup above, you can be sure that your JavaScript is linked to your external HTML file.
Congratulations!
More examples of JavaScript linking.
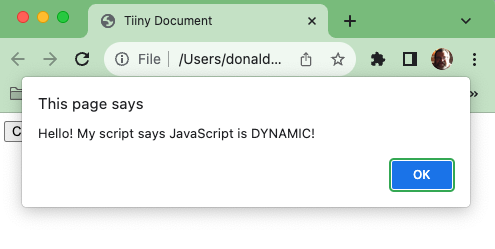
The second example is scripted in the <body> section. Scripts can appear in either or both the <head> and <body> sections, as you can see from this demo.
Here is the code:
<script>
var phrase = 'JavaScript is DYNAMIC!';

alert('Hello! My script says ' + phrase );

</script>
This script uses a variable (var) to customize the alert, showing JavaScript’s flexibility and power.
Here is the result of the inline scripting.
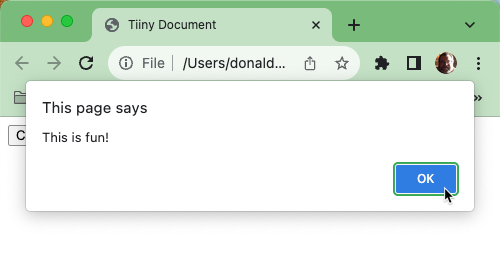
The third and final example is an interactive button placed on the web page waiting for you to click it.
Click on the button now.
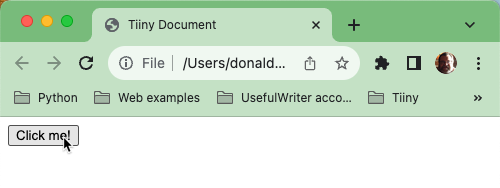
The code for this button is more complicated, but I thought you’d like to have some interactivity in your web page!
Don’t be intimidated by this script. Just know that JavaScript enables you to do almost anything you see on the web. It’s that fundamental. The more JavaScript you learn, the more you can do.
<script>

// Create a button element

  const button = document.createElement('button');

// Set the button text

  button.textContent = 'Click me!';

// Add the button to the body of the HTML document

  document.body.appendChild(button);

</script>

<script>

  const buttonscript = document.querySelector('button');

  buttonscript.addEventListener('click', function() {

    alert('This is fun!');

    });

</script>
Next steps
You may be eager to put your interactive web pages on the internet. Or are considering hosting and sharing a web project. We can help.
Tiiny.host, who brings you this helpful blog, is the simplest way to put your web pages online.
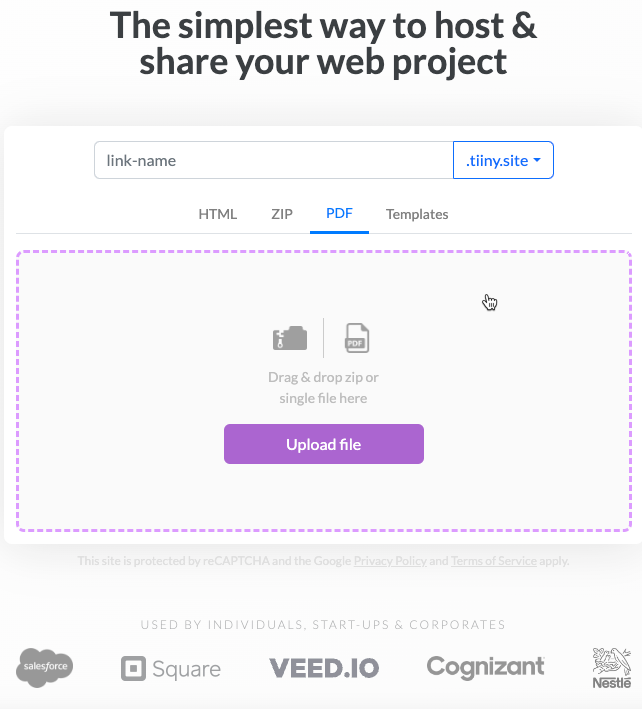
Sharing PDFs, presentations, portfolios, menus, and all other web projects is a three-step process.
- Give your new website a name.
- Drag and drop your zipped web pages into the purple-dotted form.
- Click “Upload file” and sign in or register for a free account.
That’s it. No more tedious and time-intensive FTP or complicated page formatting. You’re up and running in moments.
For free. Really.
More advanced features are available in our paid subscriptions.
Visit Tiiny.host/pricing for a comprehensive listing.
Questions or comments?
Many questions may remain after this whirlwind tour into linking JavaScript to HTML.
Contact us at Tiiny.host/help. Our awesome customer service is available free of charge, even if you don’t have an account with us. We’re glad to help out. It’s what we do.
Try Tiiny.host today for free.
FAQ: Link JavaScript to HTML
What is the purpose of linking JavaScript to HTML?
Linking JavaScript to HTML allows you to add dynamic and interactive features to web pages. JavaScript can manipulate HTML content, respond to user events, validate forms, and more, enhancing the user experience. It eliminates boring websites.
How do I link a JavaScript file to an HTML document?
You link a JavaScript file to an HTML document by using the <script> tag in the HTML. Place <script src=”path/to/your-script.js”></script> in the <head> or just before the closing </body> tag of your HTML file.
Can I write JavaScript directly in an HTML file?
Yes. You can write JavaScript directly in an HTML file by placing the code inside a <script> tag. For instance, <script>alert(‘Hello, Tiiny.host!’);</script>.
What is the difference between internal and external JavaScript?
Internal JavaScript is written directly within an HTML document inside <script> tags, while external JavaScript is written in separate .js files and linked to the HTML document using the <script src=”filename.js”></script> tag.
Why is my JavaScript code not working when linked to my HTML file?
This could be due to several reasons: the file path in the src attribute might be incorrect, the JavaScript file may contain errors, or the script might be executed before the HTML elements it interacts with are loaded. Check the console for any error messages.

