
- Why zip a file?
- What is file compression?
- What has “zip” got to do with it?
- How to zip a file on Mac
- Next steps
- How to Zip a File on a Mac FAQ
Zipping a file on the Mac is simple. I’ll show you how. But to know why to zip—or compress—a file takes a bit of explanation.
Also, there are many options when zipping files, and to access those options requires the use of the Terminal and the command line. Or, you can download a desktop app to help you with a Graphic User Interface (GUI), so you don’t have to type cryptic commands into the Terminal.
After you zip your file, you can share it online. We’ll look at our service, Tiiny.host, as the simplest way to do this.
Let’s go.
Why zip a file?
When sending any information across the internet, it takes bandwidth to transport it. Information can be in the form of text files, folders, pictures, videos—anything you use on your computer.
Bandwidth is like a tube or pipe through which your files travel over the Internet. This pipe might be narrow and can’t hold a lot of information. So, clever people have found ways to shrink the size of your files without damaging them. This allows them to travel farther and faster because they flow better through the tube.
What is file compression?
You can think of file compression as using an app to shrink your files so they travel better through the bandwidth tube. Because using bandwidth—the tube—costs money, you can also reduce costs by compressing your files. Still, the most important benefit is that your files will reach their destination quickly and unharmed.
Remember this: You almost always want to compress your files to send them by email or through any other internet method. It’s pretty much required. Files that are too big simply won’t make it to their destination, and sending uncompressed files may damage them. Get into the habit of zipping the files you send through the Internet.
What has “zip” got to do with it?
People use the phrase “zipping a file” as a common way to mean “compressing a file.” Kind of like Kleenex™ means any paper tissue.
Zip is a specific type of compressed file. There are several compressed-file formats, but the most common is a zip file. Just like a document name ending in “.txt” is a text file, “.zip” is a file or folder compressed with the zip algorithm.
How to zip a file on Mac
As promised, here are some simple ways to zip files on Mac.
Preparing your files
Zipping can be done to single or multiple files. Using a single file or folder is the best way to begin.
The instructions below refer to compressing a single file or folder. If you have multiple files to send, it’s recommended that you put them all into one folder for better organization and ease of use. This rule of thumb is not strict, you can zip multiple individual files or folders without combining them into one single folder, and I’ll show you how. But your recipient will thank you for the use of a folder.
Using the Finder
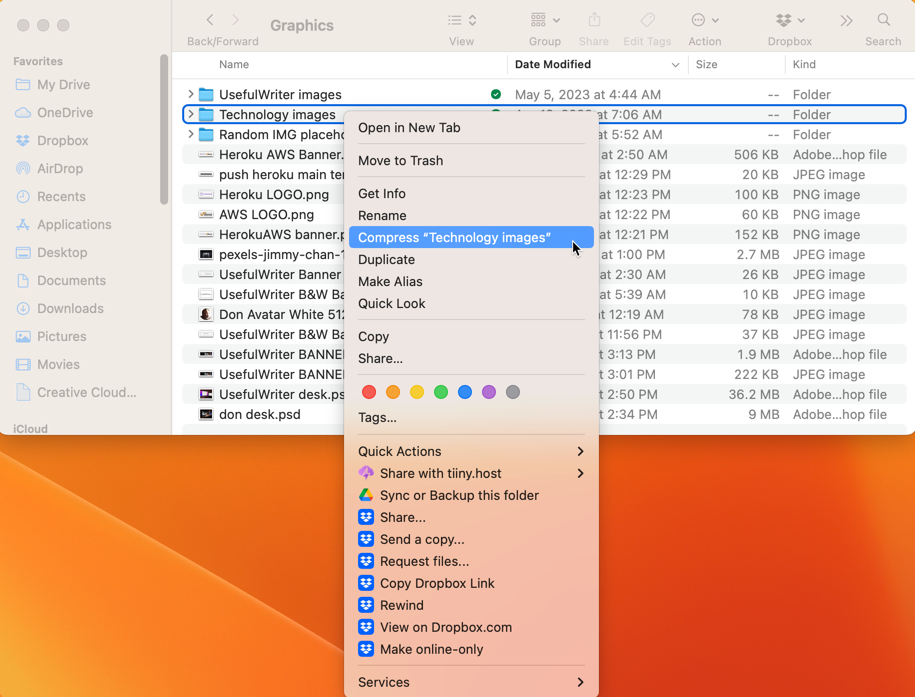
Begin by right-clicking on a file or folder. In the example, I’ve right-clicked on the “Technology images” folder in my Graphics directory.
A popup menu appears, and the menu item [Compress name-of-file] is on the menu, as seen below. Select that, and you’re done.
See? I told you it was simple.
Your zipped file appears in the same folder as your original source folder.
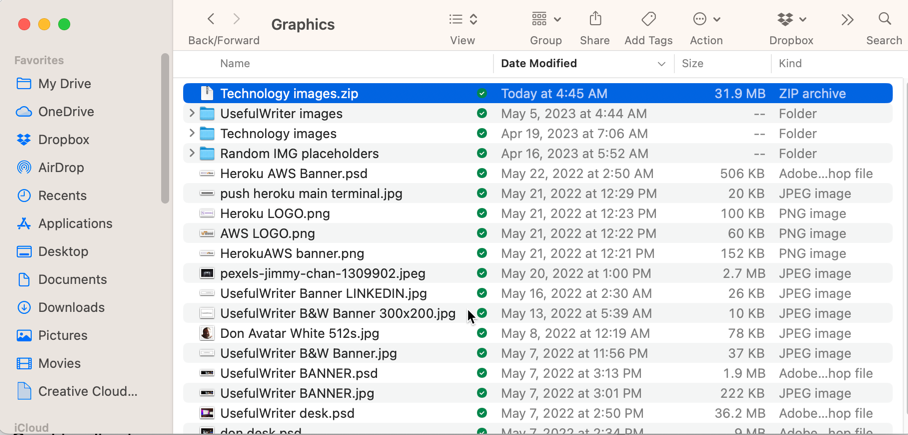
If your folder is sorted by date, it will appear at the top. Otherwise, you’ll have to look for it based on the file sorting that you’ve chosen.
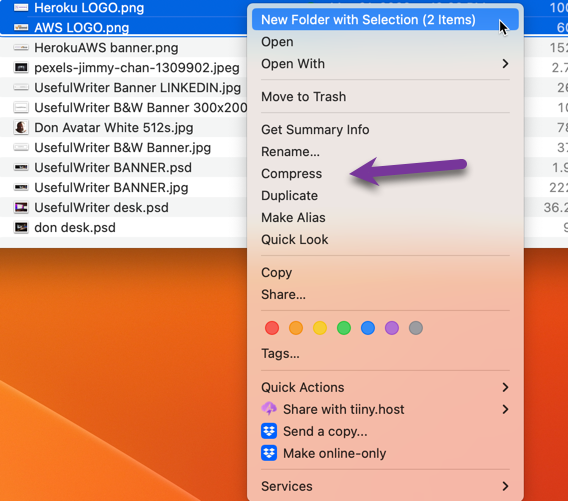
If you choose multiple items, you can put them easily into a folder. Select the files, then right-click on one, and you’ll get this popup menu. Or you can compress the files immediately by choosing the “Compress” option.
Using the Terminal
Using the terminal is powerful once you get the hang of it. The advantage of using the command line is that you have many more options. In fact, this simple command is a great way to get started using the Terminal.
For those who want to use the command line:
1. Open Terminal.
2. Navigate to the directory that contains the file or folder you want to zip.
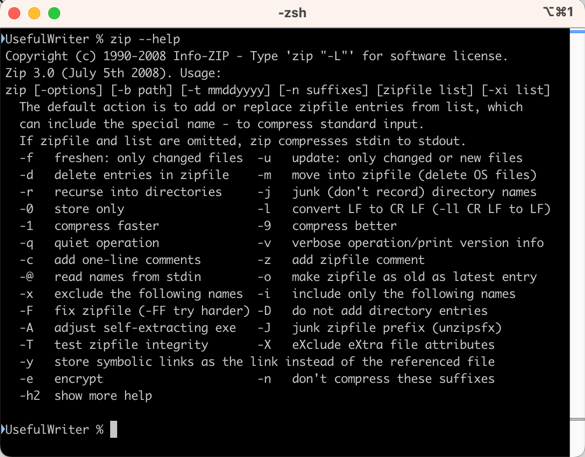
3. Type the following command:
zip -r [name of compressed file].zip [name of file or folder]
There’s a lot you can do with the zip terminal command.
But if you’re uncomfortable with using the Terminal app’s command line, you’d best use the Finder or a third-party app.
Using a Third-party App
The Mac OS ships with the Archive Utility, which creates zip archives of your files using the Finder or the Terminal. This is the app you’ve been reading about so far. You use it from the Finder or the Terminal. The Archive Utility has no Graphic User Interface (GUI). You can use third-party apps online or on your desktop to get a GUI for all the options you’ve just seen in the Terminal section.
WinZip is a freemium desktop app available for Mac and Windows. It is popular, with over 1 billion downloads. It not only zips but unzips your files, and paid levels offer many options. This is a reliable app to get your feet wet using zip apps.
EzyZip is a free online zip service that’s simple to use. All the action takes place in the top section of the homepage. Just select a file or folder from your storage, click the button, then download the zip file. That’s all it does, but it gets the job done quickly and for free.
Next steps
Sending things through email is not the only thing zipping a file is good for. Sharing any information with anyone over the internet is a good time to use your new-found zip capabilities.
For instance, if you have created a PDF, a restaurant menu, a chart or image—or even a complete static website—and want to share it with others, you can zip the folder your files are in and upload it to a file hosting service like Tiiny.host.
RECOMMENDED ARTICLE: How to build a static website
As a user of Tiiny.host myself, I can vouch for them. They’re great!
Once you visit the homepage at Tiiny.host, you are three simple steps from your files being live on the web.

- Enter the link-name for your site.
- Choose HTML, then drag and drop or upload your zipped website file.
- Click the big blue “Upload” button.
That’s it!
Tiiny.host offers everything you need for sharing a professional or personal project on the web.
Tiiny.host’s customer service is awesome! Contact them directly at Tiiny.host/help and see. They’ll answer your questions about their services, help you with any problems you encounter, and explain any issues this article raises.
How to Zip a File on a Mac FAQ
Can I unzip a file?
Yes. On a desktop Mac, simply double-click on the zip file. A folder containing the contents of that archive will appear in the same folder as the original archive.
How do you create a zip file on Mac?
Right-click on the file from the Mac Finder, and choose the “Compress your-filename” option. That’s it!
How to zip multiple files
Command-click on each file you wish to add to the zip archive. Then right-click the selection and choose the “Compress” menu option.
Why can’t I zip a file on my Mac?
The reasons you can’t zip a file on your Mac can vary:
- There is a problem with the Archive Utility app.
- There is insufficient room on your storage drive to create or save the zip archive. Use an uninstaller app or delete redundant files manually.
- The file you selected may be in use or corrupted.
- There may be incompatible characters in the filenames of your selection.

