- What is a CSV File?
- Why Should CSV Files Be Imported to Google Sheets?
- Steps to Import a CSV file in Google Sheets
- Share Your File within seconds using Tiiny Host
- FAQ: Import Your CSV files into Google Sheets
Converting CSV files into Google Sheets can streamline data management, analysis, and collaboration, making it an essential process for many users. In this guide, we’ll walk you through everything you need to know about converting and importing CSV files into Google Sheets.
What is a CSV File?
A CSV (Comma-Separated Values) file is a plain text format that organizes data in a simple, structured way. Each row in a CSV file represents a data entry, with individual values separated by commas. It’s one of the most popular formats for storing and exchanging large amounts of structured data because it’s lightweight, easy to generate, and compatible with nearly any data-processing program.
Why Should CSV Files Be Imported to Google Sheets?
Importing CSV files into Google Sheets is highly beneficial, particularly when you need an collaborative workspace for data. While CSV files are excellent for storing raw data, they lack the tools to analyze, visualize, and manipulate that data efficiently. Google Sheets enhances this data by enabling you to use functions, charts, and filters, making it easier to find insights or trends. Additionally, sharing a Google Sheet is seamless, allowing multiple users to view or edit the data in real-time, no matter their location.
Steps to Import a CSV file in Google Sheets
Step 1: Open Google Sheets
Go to Google Sheets in your browser. Log in with your Google account if you haven’t already.
Once on the main Google Sheets page, you’ll see several options to start a new spreadsheet, including templates.
Step 2: Start a New Spreadsheet
Click on the Blank option to start a new, empty spreadsheet. Alternatively, if you want to add the CSV data to an existing spreadsheet, click on the file from your list of existing Sheets.
Step 3: Import the CSV File
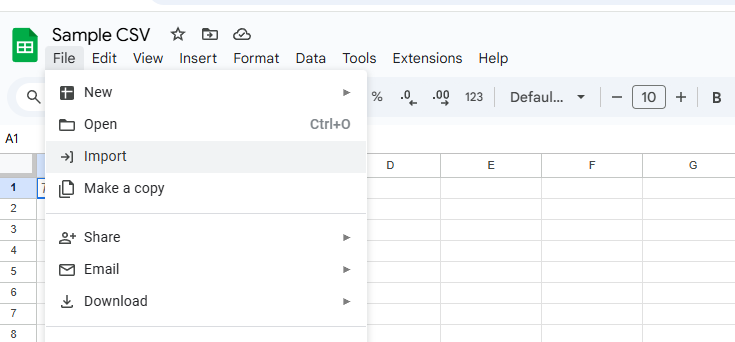
- In the new (or existing) Google Sheet, go to the menu bar at the top and select File > Import. This opens a dialog box where you can upload or select a file to import into Google Sheets.
-
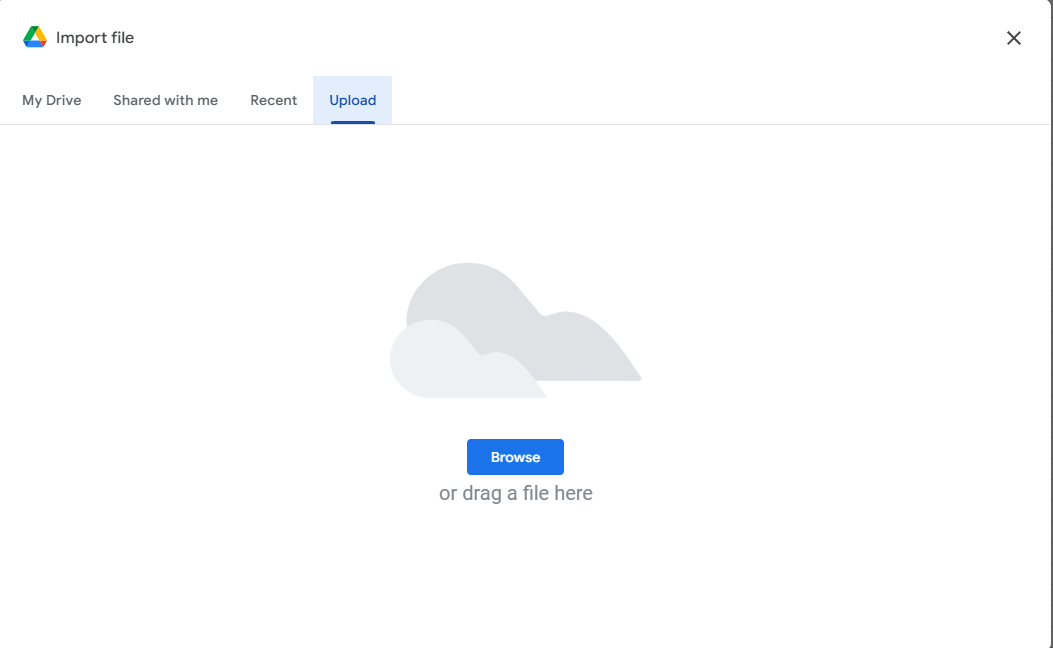
In the “Import file” dialog box:
Click on the Upload tab. You can drag and drop your CSV file into the dialog box. or select a file from your device.
Step 4: Adjust Import Settings
After selecting your CSV file, you’ll see several import settings to customize how the CSV data will appear in Google Sheets.
-
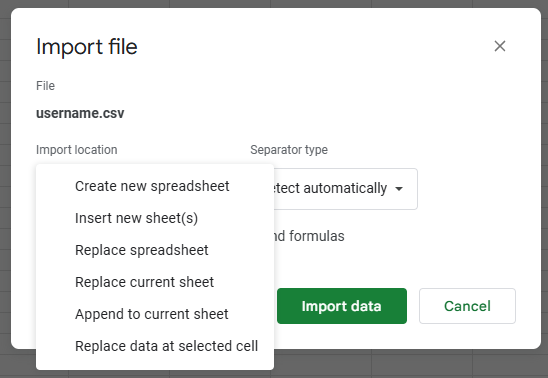
Import Location:
- Replace spreadsheet: This option replaces everything in the existing Google Sheet with the CSV data. Useful for empty sheets or when you want only the CSV data in the sheet.
- Create new sheet: This adds a new tab to the existing spreadsheet where the CSV data will appear, leaving any existing data intact.
- Replace current sheet: Replaces data in the current active sheet (the sheet you’re on) with the CSV data.
- Append to current sheet: Adds the CSV data to the end of the existing data in the sheet.
-
Replace selected cell: Places the CSV data starting at the currently selected cell, allowing for precise placement in your sheet.
-
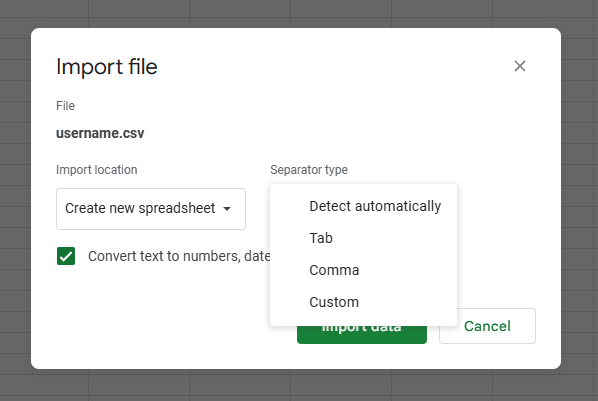
Separator Type:
This setting determines how Google Sheets separates data in each row of the CSV file. * Auto-detect: Google Sheets usually detects the delimiter (separator) used in your CSV automatically. * Comma: Choose this option if the file uses commas to separate values. * Tab: Use this if your CSV file uses tabs instead of commas for separating values. * Custom: Enter a specific character if your file uses a unique delimiter, like a semicolon (;) or another character.
-
Convert Text to Numbers and Dates:
When selected, Google Sheets will try to automatically format numbers and dates, turning them from text into recognizable numbers and dates. Leave this checked if you want Google Sheets to handle basic formatting for you.
-
After adjusting your import settings, click Import data.
Once you click Import data, Google Sheets will begin processing the CSV file. After the import completes, the data will appear in the Google Sheet based on your import settings.
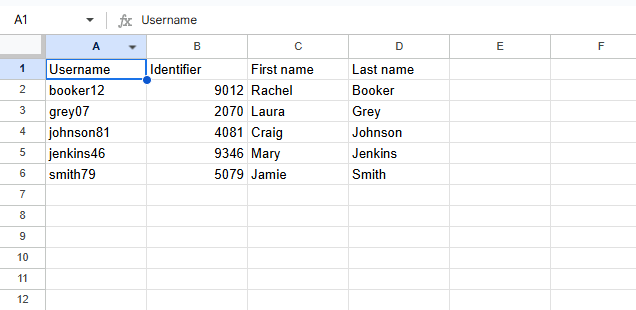
Additional Steps: Format Your Data
-
Format Cells:
Depending on the data, format cells as dates, numbers, text, or currency to ensure readability.
Select the range of cells, and then select Format > Number to choose the format you need.
-
Freeze Rows/Columns:
If your CSV includes headers, you may want to freeze the first row or column to make it easier to view data as you scroll.
Go to View > Freeze and choose 1 row or 1 column to lock these in place.
-
Use Data Cleanup:
You can use Google Sheets’ Data Cleanup tools to detect and correct issues like duplicates or inconsistent formatting automatically.
Go to Data > Data cleanup for these options.
Step 5: Save and Share Your Google Sheet
Save your file in your computer in your desired format or share it directly through Google Sheets.
Share Your File within seconds using Tiiny Host
You can host your file after downloading it in your preffered format directly through Tiiny Host in few easy steps.
- Visit Tiiny.Host
- Upload your CSV file
- Give a name for your link or leave it blank
- Hit Publish!

FAQ: Import Your CSV files into Google Sheets
Is there a way to import only specific columns or rows from a CSV file into Google Sheets?
Directly importing a CSV file imports all data, but you can modify your imported data afterward. If you only need specific columns or rows, you could import the data and then delete unwanted sections, or use an import script to customize the data extraction.
What should I do if I encounter an error while importing a large CSV file into Google Sheets?
If you’re dealing with a large CSV file, Google Sheets might have limitations with data size. You could try splitting the CSV into smaller files, compressing the data, or using Google’s BigQuery for larger datasets, which can be linked to Google Sheets.
Is it possible to convert a Google Sheets file back to CSV format after importing?
Yes, once your data is in Google Sheets, you can export it back to CSV. Go to File > Download > Comma-separated values (.csv, current sheet) to save the current sheet as a CSV file.


